Tuesday, February 28, 2012

A "Love" Lesson


The Take Twelve challenge this month was to take photos of colors that remind you of Valentine's. I decided to go a different route and interviewed my family on the meaning of love.


The process was quite fun as I pulled each one into a separate room for a private, one-on-one interview. The kids thought it was fun and I highly enjoyed hearing what each one said. You can click on any photo for a better view.

Left Page

For extra definition I printed labels with words that my family uses to define love.

Right Page
Supplies (all CTMH unless otherwise noted):
Paper: White Daisy Cardstock, Sweetheart (retired)
Stamps: none
Ink: none
Other: Dimensional Elements, Chipboard Hearts (Bo-Bunny), Art Philosophy Cricut

Sunday, February 26, 2012

Love Frame


I was late in getting my project posted for the Use Your Stash Blog Hop this month but I wanted to post my project anyway. The theme was buttons or flowers...I have lots of both!


The frame is 8" x 10" and the heart was cut with my cricut at 5". This project came together very quickly and will be part of my Valentine home decor.


If you'd like to check out this month's blog hop please go here.

Supplies used (all CTMH unless otherwise noted): 
Paper: White Cardstock, Tulip Cardstock
Stamps: State of Mind
Ink: Versamark
Other: Black Embossing Powder, Red Assortment Buttons, Plantain Cricut Cartridge

Friday, February 24, 2012

Mojo Monday 229

I used this week's Mojo Monday Sketch to create a sweet 16 card for my nephew. We recently had the pleasure of spending the weekend with him and his family and one thing was very clear after our weekend...this boy ROCKS!


So, I thought it was fitting to create a card centering around his rock star self. The base of the card is a standard A2 size and the 5 pattern paper strips were cut at 1" x 4". I stamped on the Top Coats with StazOn ink. To get the curve of the stamped sentiment I first placed the stamps on the Top Coat piece and then picked them up with my acrylic block. PERFECTION!!


It's hard to tell in the photo but the cardstock piece underneath the Top Coat Overlay was misted with reinker and Create-A-Shade Pearl Paint. The paint adds such a nice shimmer in real life!

Here's the inspiration sketch:

Supplies used (all CTMH unless otherwise noted): 
Paper: White Daisy Cardstock, Rock Star (DCWV), Green Cardstock (American Crafts), Twilight Cardstock, Bamboo Cardstock
Stamps: Card Chatter (Birthday), Trinity Alphabet
Ink: StazOn (Black)
Other: Twilight Re-inker, Misting Spray Pen, Create-A-Shade Pearl Paint, Top Coats Rockin' (retired)

Thursday, February 23, 2012

Hair Bow Organization

I recently saw this project in the Simply Handmade Magazine and I knew I had to re-create it for my daughter.

It was such a quick project to make as I already had a ton of ribbon and some leftover felt (not sure why I had that to begin with).

I tried running the felt through my cricut to cut the heart shapes but because of the adhesive backing on the felt that didn't work. So instead I used my cricut to cut heart templates on paper and pinned them to the felt which I hand-cut. The large purple heart was cut twice.


Once they were cut I layered each piece and hand sewed with white embroidery floss. Before the two purple layers were completely sewed I stuffed the heart with filling to give it some dimension and also attached the ribbon to both the top and bottom.


I used a small command strip on the back of her bathroom door to hold her organizer. Boy does this make morning routine quicker...no more searching in a plastic bag for hair bows!


P.S. My super awesome co-worker and friend, Maureen, makes the hair bows. She is awesome!!

Supplies used (all CTMH unless otherwise noted): 
Paper: White Cardstock (on hand)
Stamps: none
Ink: none
Other: Felt (Walmart), Ribbon (from stash), Embroidery Floss (from stash)

Level 1, 2, 3...What the Heck??

For anyone that's ever looked at a CTMH catalog or been to a gathering, the number one question I receive is what is the difference between Level 1, Level 2 and Level 3 layouts. Levels are CTMH's representation and guides for their faster, simpler, easier philosophy for scrapbooking. Here's a little closer look at each:


Level 1...Simply Beautiful: Have lots of digital photos? You'll love Studio J, our patented online design software that gets your photos off the memory card and into your life! Create a layout in as little as five minutes, with as many as 15 photos! It's photo archiving and artwork in a snap. Look for the Level 1 symbol in the Spring/Summer Idea Book on pages 11-61 for Studio J designs you can make in minutes.


Level 2...Especially Creative: Great handcrafted projects start with a strong foundation: CTMH's gorgeous and versatile My Reflections papers! B&T Duos papers are cardstock-weight, are perfect for layering, and feature a different design on the front and back. Pick a design pattern from any of Jeannette Lynton's how-to books, add in easy-to-use coordinating accessories, and let your creative self run wild-no stamping required! See the Level 2 symbol on pages 16-58 for great ideas to inspire you.

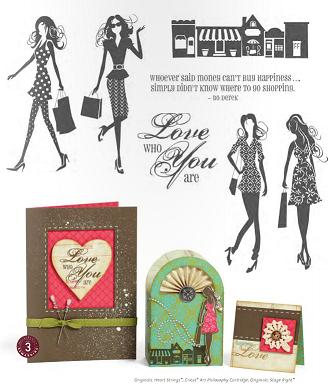
Level 3...Masterfully Rewarding: Live your creative life to the fullest with our top-quality My Acrylix stamps! These clear stamps offer unparalleled flexibility for your one-of-a-kind masterpieces, featuring designs to suit any occasion, holiday, or style with flair. See the Level 3 symbol on pages 14-60, as well as stamped artwork through the Idea Book for exhilarating ways to accent any project with the beauty of stamping.

I hope this helped clear things up a bit.  You can find examples of each level my using the Level 1, Level 2, and Level 3 labels on the left side of my blog. I'm always here if you have more questions or need help with something. Shoot me an email, handmadefromtheheart@gmail.com, and I will help you in whatever way I can. I am here for you!!

Monday, February 20, 2012

1 Stamp Set: Male vs. Female

When you look through the CTMH Idea Book you'll probably see some stamp sets that you'll automatically label as either "male" or "female." I know at least I do!


The CTMH Video below will show you that with a little imagination and some simple color palette changes, you can achieve a masculine or feminine look using the exact same stamp set!  Check out the video to see how to create the scrapbook pages featured on page 89 of the Spring/Summer 2012 Idea Book.


I have both boys and girls and am thinking I need to add this adorable set to my wish list! I can picture lots of very cute birthday cards being made in the near future...

Friday, February 17, 2012

MOJO Monday 228

This week is a just for fun challenge at Mojo Monday and here's my creation.


I used a retired paper pack, Miracle, and the coordinating Stickease to create this card. I love when cards come together quickly!

Supplies used (all CTMH unless otherwise noted): 
Paper: Kraft Cardstock, Miracle (retired)
Stamps: n/a
Ink: Cocoa, Crystal Blue 
Other: Miracle My Stickease (retired), Dimensional Elements, Green Grosgrain Ribbon, Baby Rub-Ons (Making Memories)

Here's the inspiration sketch:

Wednesday, February 15, 2012

Technique Blog Hop - Even Easier

Welcome to our Technique Blog Hop!  This month we are highlighting the Even Easier Technique as shown on page 91 in the Spring/Summer 2012 Idea Book!  This blog hop is a great big circle so you can start wherever you want and continue through to see all the fabulous artwork incorporating this technique. 

We would love to see what you’ve created using this month’s technique, please visit our challenge blog at http://technicallyterrific.blogspot.com where you can share your project and be entered in a chance to win great prizes.  You will also find a listing of all participants and their blog addresses if you should get lost or want to reference a blog along the way.  Let’s get started!

If you are coming from Bethany's Blog, you are on the right track! 


I've had this box for a few years now just waiting to be used. So, this month I finally decided to use it and created our Family Treasure Box. Unfortunately CTMH doesn't make the memory box anymore but this same project could be done using the photo boxes that are always on sale at the local craft stores.

Front of Box
Once I decided on a layout for the top piece (I used a Reflection How-To Sketch and then modified the sizes), I used my Cricut and the Family Love stamp set to help me decorate it!

Detail of Sentiment - Cut with Cricut
I knew I wanted the family sentiment as a main focal point so I cut out <Shape 8> on B&T paper and stamped the sentiment in Versamark. Then, I heat embossed using black embossing powder.

Title Detail
I also cut the FAMILY title using Art Philosphy font and layered the letters onto the coordinating Dimensional Elements. Boy does that save my little fingers some cutting!
Box Top with Dimensional Elements
I finished off my project by adding some of the beautiful new Bohemian Accent Flowers and Sparkle Nourishes. I know this will be handled quite a bit so I added a few thin layers of Mod Podge to help protect the papers and keep it looking in tip-top shape. I'm working on something special for the inside cover so stay tuned for that! 
Detail Front
Supplies used (all CTMH unless otherwise noted): 
Paper: Stella Level 2 (X7147B), Black Cardstock
Stamps: Family Love (D1506)
Ink: Tulip (Z2166), Black (44751), VersaMark
Other: Black Embossing Powder (Z670), Finishing Files (Z1091), Heat Gun, Mod Podge, Tweezers, Dimensional Elements Alphabet (Z1682), Cricut Art Philosophy Cartridge, Bohemian Assortment (Z1687), Sparkles Flouishes (Z1708), Bling Assortment (Z1466)

Thanks for stopping by!  Please continue onto Tonya's Blog where you will find some additional artwork highlighting this technique!  Be sure to leave a comment and let me know what you thought of my variation. Happy hopping!

Friday, February 10, 2012

MOJO Monday 227 Version #2

I was thinking about this sketch all day and raced home from work to make it before my kids came home.


I flipped the sketch horizontally and used some leftover MyStickease for the top portion. The banner was stamped using the Pennants alphabet stamp and tied onto the card front using CTMH's new Baker's Twine.

Thanks for looking...again!

Supplies used (all CTMH unless otherwise noted): 
Paper: You Rock (Retired), Outdoor Denim Cardstock
Stamps: Pennant Alphabet
Ink: Orange
Other: 3D Foam Tape, You Rock My Stickease (retired), Bakers Twine, Brads-Autumn Harvest, Corner Rounder, Piercing Tool

MOJO Monday 227

It's contest week over at Mojo Monday so I thought I'd play along.


The sentiment piece was cut using Rectangle 7 on the Art Philosophy Cartridge. I cut it in black cardstock at 2" and then again at 1 3/4" on white daisy cardstock. The sentiment was a little longer than the shape so I masked off the "Flutter" piece and stamped it separately. 


Supplies used (all CTMH unless otherwise noted): 
Paper: Sweetheart B&T (retired), Black Cardstock, Grey Cardstock (American Crafts)
Stamps: Butterfly Wings (retired)
Ink: Black
Other: Hollyhock Ribbon, Pink Sparkles, 3D Foam Tape, Wings Level 2 Assortment, Cricut Art Philosophy Cartridge

Here's the inspiration sketch:

Thursday, February 9, 2012

Nifty Neighbor Gifts

With just a few crafty products, it's fun and easy to create heartfelt gifts for your neighbors and friends. Find out how simple it is to make these gorgeous gifts filled with delicious delicacies! 


In this Close To My Heart video, we show you how to create the gift packaging featured on page 82 of our Spring/Summer 2012 Idea Book. Wouldn't these be cute for teacher gifts, party goody bags or special Valentine's treats?!


With the Cricut Art Philosophy Cartridge you will have access to unlimited ideas for gift giving, card making and scrapbook page titles and embellishments. To learn more and to see the images that are available go to this post. If you're ready to try out the Art Philosophy Cartridge for yourself go here.

Tuesday, February 7, 2012

Request for V-day Cards

I don't normally like to send mass requests to people but this cause is so worthy that I hope you will take a moment and make one extra Valentine to share with this little girl. 

Here's her story:

Can you help brighten Valentine's Day for a 6 year old???

Allison is a patient at Cincinnati Children's. She is 6 years old. After 15 months of treatment that had some bumps along the way (big scary bumps), she was found to be cancer free. Everyone rejoiced and celebrated. At the three month scan still cancer free, more rejoicing and more celebrating. However, at the six month scan, just weeks before Christmas, the doctors found more cancer. The type of cancer that Allison has is very fast growing and aggressive because of this it is extremely hard to treat and the doctors give her a 5% cure/survival rate. Through January and into February Allison will have to undergo a very risk type of radiation which should be completed the week of Valentine’s Day!

The pastor at Friendship Lutheran Church in Cincinnati, OH has been visiting with this family for over a year now and the church has sort of adopted them, since they're not from the area, to try to encourage and love on them through their journey Now Allison and her family are back home and we have teamed with St. Paul Lutheran Church in Ironton, OH. With Valentine's Day coming up, they thought it would really brighten Allison's day to get like a bazillions Valentine's cards.

Last year the people of Friendship Lutheran started hoping they would get a 100 or so valentines. Thanks to people from literally all over the world we collected over 10,000 valentines. This year we are dreaming big and hoping to be our record.

YOU CAN HELP???
We're asking everyone we know to consider mailing a Valentine's card for Allison that the church can compile and take to her. If you wouldn't mind picking up a card - or even making one! - and mailing it to:

Valentines for Allison
c/o St. Paul Lutheran Church
PO Box 601
Ironton, OH 45638-0601

Can't get a card in the mail just invite everyone you know.... so they have the chance to make Allison smile too!

Thanks for helping out! I hope this will really help her to feel special and loved as every 6 year old princess should be!
My card will be in the mail soon! Please help brighten this little girls day!  

Monday, February 6, 2012

24 Photos, 1 Layout


I know what you may be thinking...24 photos on one layout?! Yeah right. They are either really small or she needs to go back to school for some counting lessons. I promise you though there really are 24 photos!

How did I do it? Simple. I used the Magic How-To Book and the Deck of Cards design. If you are new to the How-To Books they are essential scrapbook and card making tools. They are different than other sketch books because these ones provide cutting diagrams, beautiful full color examples, and tips and techniques that will teach (or remind) you of new ideas and ways to use your products.


So, how exactly did I fit so many photos? Easy...I used mini pull-out albums. On the right page, behind each 3 x 3 photo I made individual mini-albums featuring Christmas memories of each child. It's neat, tidy and interactive!

I chose to put photos on the front-side of each mini-album. The backside includes journaling of each photo. However, I could have easily fit another 16 photos on this page. Here are close-ups of each mini-album:

Family:


Sofia:


Gino:


Luc:


If you are ready to stop agonizing over your design and start producing I highly encourage you to check out these  How-To Books . They have literally changed the way I make pages and cards. I no longer spend my time searching the Internet for sketch ideas nor do I waste my precious time and paper making cutting and design mistakes. If you want to try one email me or leave a comment with your email. I'll send you a design page to try for free!

Supplies used (all CTMH unless otherwise noted): 
Paper: Believe (retired), Garden Green Cardstock, White Daisy Cardstock
Stamps: Trinity Alphabet, Family Love, Authentic
Ink: Archival Black, Garden Green
Other: Piercing Tool, 3D Foam Tape, Mini-Medley Holiday (retired), Mini-Medley Olive

Friday, February 3, 2012

February Creative Club


This month it's all about love as we are alter a wood frame and make a fun gatefold card! The gatefold totally reminds me of a hug which is perfect for the sentiment on the inside of the card! We will also color the new Seam Binding Ribbon using My Acrylix Inks to create a super adorable rolled flower.


Normally my creative club meets the 2nd Friday of the month but conflicting schedules have my club meeting Friday, Feb 3.

If you weren't able to make the live date I have limited kits available for purchase. Each kit is $5. If you are local we can arrange delivery. For those not local there is a $5 shipping charge.


Here's what's included in your kit:

  • Wood Frame (I will pre-paint the edges for you)
  • 18" of Seam Binding Ribbon 
  • Pre-cut papers (equivalent of 2 sheets of cardstock and 1 B&T)
  • Pre-stamped images
  • Detailed instructions with cutting diagrams and pictures
To order your kit please choose one of the two choices below. As soon as I receive delivery I will get them mailed ASAP!


Options


Thursday, February 2, 2012

Mojo Monday 226


This week's MOJO Monday Sketch was nice and simple so I'm playing along! I can't get enough of the new Florentine paper so of course I had to use that! Oh, and I have to warn you...you'll be seeing a lot of the stamp set I used too! It's probably my favorite in the new Idea Book.

The card is 4" x 4" which is not my typical size. But, I had a scrap of Vanilla Cream Cardstock in my pile so that's what I used. The pattern paper pieces are 3 3/4" x 1 3/4". The piece covering the seam was cut from another piece of the Florentine paper and then trimmed along the bottom edge to look like lace.


Here's the inspiration sketch:


Supplies used (all CTMH unless otherwise noted): 
Paper: Florentine, Vanilla Cream Cardstock
Stamps: Card Word Puzzle
Ink: Twilight
Other: Sparkles Flourishes, Glitz Gel-Bronze, 3D Foam Tape, Blending Pen

Wednesday, February 1, 2012

February SOTM

Today is a busy day with the launch of the new Spring/Summer 2012 Idea Book and the start of a new Stamp of the Month!

This month features a very versatile stamp set that is perfect for cards or altered gifts. And, it coordinates beautifully with the Art Philosophy (AP) Cartridge making it a blast to create meaningful items quickly!


So, what can I make with this set? Look below for some fabulous ideas developed by the CTMH Art Department.


How do you know which items work with the AP cartridge? Any image that is outlined in red! That applies to any stamp set in the Idea Book.

How do I know what size to cut? On the stamp carrier sheet there is a number next to the images that coordinate with the AP Cartridge. That number is the size you should use.

OK, how do I get my own set? That's easy. You can buy it outright for $17.95 or you can get it for $5 when you spend $50. To order you can get it directly from my website or email me!

New Idea Book Giveaway!

Today is the first official day of the Spring/Summer 2012 Idea Book!! I have been busy creating some fabulous items with the new products and hope to get them photographed and up on my blog soon.

If you haven't ordered your copy it's not too late. I'm so excited about this book that I want everyone to have one! So, I'm giving the book away...for free! All I ask is that you pay for shipping up front. When you get your book you'll also receive a coupon for $5 off your first purchase.

To order your very own copy go to the left side bar under Current Idea Book and click the pay pal link. I'll automatically send you one. Since the coupon is a "Michelle Only" special and not endorsed by CTMH you will need to email me your order so that I can cover your coupon cost!

If you prefer to preview the Idea Book on-line you can do so HERE. Don't get frustrated if you can't log on right away. The site has a lot of traffic today and things are a little slower than usual.

Now that the new book is live this means that items from the Spring/Summer 2011 book can no longer be ordered. If you still have it and see something you forgot to get let me know. Chances are I either have an extra or I can find someone that does. Also, don't forget to check out the While Supplies Last section of my website. You may find what you are looking for there!