Showing posts with label Banner. Show all posts

Sunday, June 2, 2013

June Specials-Help the USO and Red Cross!

I'm very excited and so lucky to have found a company so giving and charitable! Close To My Heart has three fantastic specials this month...two of which support the USO and the American Red Cross.

Relief for Oklahoma


Close To My Heart is making a new Autumn/Winter 2013 stamp set, A True Thank You, available immediately and will donate 100% of the profits from sales of the set from May 23 through June 30 to the American Red Cross to aid the Oklahoma victims. Help us provide relief to those affected by the devastating Oklahoma tornado by purchasing A True Thank You stamp set for $2.95 (M1029) today!


Let's Get Patriotic


Show your support of troops and country with new patriotic stamp sets — available only from June 1 to July 31, 2013! As a show of our support, Close To My Heart will donate $3 from each B-size My Acrylix® Courage stamp set and $5 from each D-size My Acrylix® Home of the Brave stamp set to the USO, the leading, most recognized military-support and services organization in the United States, or $3 from each B-size My Acrylix® Courage stamp set and $5 from each D-size My Acrylix® Strong and Free stamp set to the Canadian Hero Fund, which supports spouses and children of fallen Canadian military troops by providing post-secondary education in Canada. Show your support today—stamp style!

Make It A Banner Day!


It’s going to be a “banner” day! When you place a $25 order that includes a stamp set, you’ll receive a My Creations® mini banner for free! The mini banner includes 10 chipboard pennants in 4 different shapes with 9 jump rings for hanging. Use the mini banner as a decoration for your parties and get-togethers this summer. Make it a “banner” day in June!

Check out this video for more ideas and inspiration:


and last but certainly not least...

June Stamp of the Month


Each month you can enjoy a new D-size stamp set, available for one month only, for just $5—that’s over 70% off retail! When you place an order of $50 or more in Close To My Heart products, you qualify for this special Stamp of the Month pricing. This month the stamp set is A Flowering Bunch (S1306A)...so cute with so many possibilities!

To purchase any of these products please visit my website today!

Sunday, April 14, 2013

Party Favor Ideas!!


Whether you use one Cricut®-cut piece or several, you can create cute party favors and decorations using your Artiste cartridge. Combine your Cricut® pieces with unique stamping techniques and you have projects that will knock your guests’ socks off! Want some recipes and tips for how to make this adorable artwork? Below are instructions for creating two pieces from the “Clearly the Best: How to kiss—with stamps” episode. Combine the Cricut®-cut pieces for these projects with the kissing stamping technique and you have a stellar 3-D item! 


Party Banner
Stamp set of your choice
X5668 Honey Cardstock
X5764 Pear Cardstock
1272 Cranberry Cardstock
Z2197 Pear Exclusive Inks® Pad
Z2163 White Daisy Exclusive Inks® Pad
Z1751 Baker’s Twine Harvest Assortment
Z1311 1¼" Circle Punch

Cricut® Shapes:
Artiste
1" Shift+3D Object <J> (cut 56, p. 57)
Art Tip! This banner only uses one type of Cricut® shape, but the finished product is still stunning. Use stamp kissing to randomly stamp across the pieces using the stamp set of your choice. Score with the help of the Cricut®-cut score lines on the shape and piece together to create little globes. Tie together with baker’s twine and voila!


Owl Miss You Bag
1385 White Daisy Cardstock
1292 Crystal Blue Cardstock
X5668 Honey Cardstock
X5930 Slate Cardstock
Z2162 Honey Exclusive Inks® Pad
Z2117 Crystal Blue Exclusive Inks® Pad
Z1349 Shimmer Designer Brads
Z1752 Sparkles Clear Assortment
Z1311 1¼" Circle Punch
Twist Ties
Thread

Cricut® Shapes:
Artiste
4½" 3D Object <Hallween> (p. 77)
4½" Shift+3D Object <Boo> (cut 2, p. 77)
1" Shift+Accent 2 <A> (p. 51)
Art Tip! This project uses many Cricut® shapes and all the pieces coordinate so nicely for an adorable finished product. Use the Artiste assembly booklet to put the bag together and then add the embellishments. The feathers are created with punched circles that are stamped using the kissing technique; however, if you don’t have the circle punch, you can easily make these using the Cricut as well. The eyes were created using Shimmer designer brads, but you can use any large brad or button to create the same look. Finish with the “owl miss you sentiment” for a special touch.
Be sure to share these tips with your customers! The owl bag and party banner are great projects to create at a workshop or club. 

It’s a Cricut® party! If you'd like to purchase any of the items needed to make these adorable projects please visit my website HERE.

Tuesday, February 5, 2013

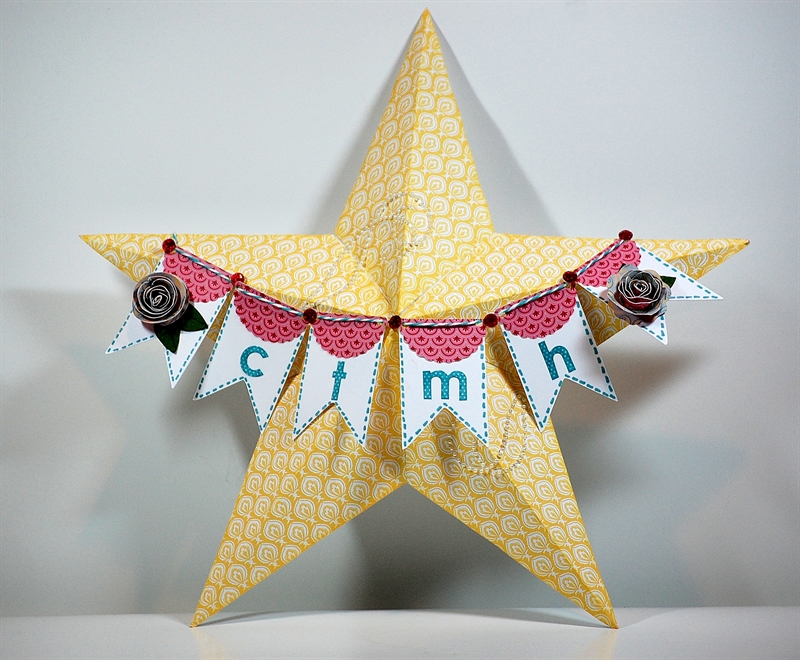
Chantilly & My Creations 3D Star

I've been working on some items for my vendor table I'm attending this weekend and made this adorable 3D star from the My Creations products.
 
 
The paper is from the new Chantilly pack. Gorgeous right?! To create this star I used the template provided by CTMH to trim my papers. You can get the template HERE.
 

The banner was cut at 1 1/2" from the Cricut Art Philosophy Cartridge on White Daisy Cardstock. The pink scallop pieces were also cut with the Art Philosophy Cartridge. I re-sized them in Cricut Craft room for a perfect fit on top of my banner.

 
I decorated the end pieces with two different rolled flowers (also from Art Philosophy). Each flower was cut at 2 1/2" from the same pink pattern paper as the scallop. I rolled the flowers with the pink to the inside so that the opposing pattern was highlighted.


The letters on the banners are from the Lots of Dots Color-Ready Alphabet (retired) set and colored with the Twilight alcohol markers. I strung my banner with the coordinating Paradise Assortment Baker's Twine and finished it off with pink glitter gems. It's hard to tell in the photo but I also added a pearl flourish to both the top and bottom of my star.

Supplies used (all CTMH unless otherwise noted):
Paper: Chantilly Paper Pack, White Daisy Cardstock
Stamps: none
Ink: Buttercup, Twilight Alcohol Marker
Other: My Creations Star, Pink Glitter Gems, Paradise Assortment Baker's Twine, Color-Ready Alphabet, Cricut Art Philosophy
 
This woud make a perfect personalized gift for a special friend or loved one! If you'd like to purchase any of these items please visit my website.

Monday, March 19, 2012

Take Twelve - March Baseball Layout


The Take Twelve challenge for March was to take photos of things that remind you of all the ways you are lucky. I strayed again and went with photos from my son's first baseball tournament of the year. They played in 40 degree weather with wind and boy were we cold!


I used the sketch provided from Take Twelve as the starting point for my layout. The photos on the right page was created using the collage feature in Picasa (just found it and loving it!). Now, I don't have to print each photo, trim and then mat. Yeah!


I finished the layout off with a stamped pennant border and a clip-art baseball embellishment printed on cardstock. In case you're wondering his team went 0-3. Better luck next time right!

Supplies used (all CTMH unless otherwise noted): 
Paper: Fanfare B&T (retired), Cranberry Cardstock, White Daisy Cardstock
Stamps: Pennant Alphabet
Ink: Outdoor Denim
Other: Baker's Twine, Paper Piercer, Liquid Applique, Crop-O-Dile, Ruler, Stickers (from stash), MS Clip Art

Wednesday, October 26, 2011

Creating a Halloween Banner - Part 3

If you are just now joining me then you'll want to go to Part 1 and Part 2 first. If you've been with me the whole time thank you. We are almost finished with our Halloween banner! Now that we're done with our prep work we can move on the best part of all -- assembly!

Step 7 - Assemble pennants


Layer your paper pieces and adhere to pennant. Make sure to alternate pennant patterns before you add your letters! Once the tops of your pennants are attached trim the edges flush with the pennant. Start adding your embellishments. Don't be shy about using foam tape. When you hang your banner on your mantle, door, or wall the dimension will give it lots of interest! Continue assembling the rest of your pennants.

Step 8 - Stamp bats on 3 Pennants


Stamp bats (or other images) using Colonial White Ink on the 3 dark pennants. When using Colonial White Ink remember that it is similar to VersaMark in that it's very thick and sticky and easily slides on your paper. Therefore, make sure you stamp straight up and down and not slide or rock your image. Also, please remember that it takes a little bit to dry so don't stack anything on top!

Step 9 - Final Steps

Trim and attach pieces from Midnight Felt shapes to create multiple banner elements. Once all your banners are decorated, turn the pennants over and use a pencil or hole punch in top two pennant corners. Attach pennants together using included jump rings or ribbon.

Congratulations! You have completed your banner!!

Now let's get a close-up of each one:


I hope you enjoyed this project as much as I did! This really came together quickly and I hope you'll give it a try!
~Michelle

Friday, October 21, 2011

Creating a Banner - Part 1

Pennants and banners are all the rage right now. If you open a craft magazine you'll see them in everything from cards to scrapbook layouts to cake decorations. Today I'm going to show you how to create a home decor project with banners. I'm choosing to make it for Halloween but you can choose to do it for any theme or color scheme you want. This will be a three part series. I hope you'll follow along with me.

To get started here's a list of supplies you'll need (if you would like to order please go HERE or EMAIL me):
  • Assorted Paper - I'm using Mischief Level 2 (Z1378)*
  • My Creations Chipboard Banner (Z1378)
  • Dimensional Elements Notable Alphabet (Z1682)
  • Halloween theme stamp set*
  • Ink to match (Black, Colonial White, Grey Wool for my project)
  • Felt Shapes (Z1462)*
  • Sanding Kit (Z1294) or Finishing Files (Z1901)
  • Scissors
  • Corner Rounder
  • 3D Foam Tape
*Note: These items are all part of Mischief WOTG.

Now on to the project...

Step 1: Trace and cut 6 banner pieces on pattern paper (3 pennants for one pattern and 3 on another).


I find it best to adhere the banner to the wrong side of the paper first. Then, Trim with your scissors. Alternatively you can trace your banners with a pencil and then cut. To eliminate some cutting, make sure to line your banner along the edge of the cardstock. With a 12 x 12 sheet you will easily get 3 banners out of one sheet.

Step 2: Sand and ink your edges


Depending on your scissors you may find it difficult to make smooth cuts along the banner edge or around the corners. To fix this you can use your sanding kit or finishing files to smooth out any jagged cuts. Don't worry if you sand a little too much and see white. Just swipe your edges with your black ink pad!

Step 3: Trim your remaining papers


Go here for cutting diagram. Round two kitty corners on each of the six 1 3/4" x 1 3/4" accents.

Stay tuned for part 2...