Showing posts with label Home Decor. Show all posts

Saturday, June 18, 2016

Party Favors & Home Decor, oh my! Time for Friday Flash Sale #3!


Party  favors , home décor, cardmaking, scrapbooking, papercrafting—we've bundled together all sorts of products to help with all your crafting needs! This week's bundles are only available until 3:00 pm (MDT) on Monday, June 20 . See what's on sale now! 

~Michelle

Wednesday, June 8, 2016

Quick and Easy Father's Day Gift


I made this project last year and realize I forgot to post it on my blog. If you are looking for a quick and easy Father's Day/Grandfather's day gift this one is it! It's simple. It was quick. It's meaningful!


This project uses the 5" x 7" Hinged Display and leftover Picture My Life cards (PML). If you don't have any PML cards just use scraps of your favorite pattern paper!

A few simple embellishments and my dad had an awesome gift to display on his desk at work! 

Happy crafting!

~Michelle

Wednesday, May 18, 2016

Fun and Easy Sunshine Wreath


With all the cloud and rain we are having in Northern VA I thought a little sunshine project was appropriate! This project uses paper from the Georgie line but really any paper would work.

If you are receiving this post via email you may need to click on the post title to view the video.

Enjoy!

~ Michelle

Tuesday, July 28, 2015

American Star - Creating on a Budget


I love decorating my home but I hate spending money on items that will only be out a few months each year. So, in my attempts to be frugal I tend to make items here and there. I was browsing the While Supplies Section of my website recently and came across the My Creations Star. I loved it when it was introduced and gladly snagged a few once I saw the price was reduced!

This project came together very quickly (like under an hour) and was a great way to use up pieces of leftover cardstock. Less than a half sheet of each color was used. The white stars are self adhesive enamel and give a nice dimension to the piece. Each package of White Enamel Stars comes with 72 pieces in two different sizes. I used the larger stars so needed 2 packages (you could easily make this project using one package if you don't mind mixing sizes). I finished it off by sealing with Mod Podge for extra stability.

I'm pretty pleased with how this project turned out and super happy it cost less than $15 to make! I'd say that's a win!

Supplies Used (all CTMH Unless Otherwise Noted):
Paper: Holiday Red Cardstock (retired), Outdoor Denim Cardstock (1275), White Daisy Cardstock (1385)
Stamps: None
Ink: None
Other: MyCreations Star, White Enamel Stars (Z2010)

I'd be happy to help you make this project! If you purchase the My Creations Star from my website I will gladly email you a template to cut each piece of the star. I'm not sure how long the star will be available so don't wait!

~Michelle

Sunday, May 24, 2015

June Creative Club - 8" x 10" Artfully Sent Canvas Project


If you think the Artfully Sent Cricut Cartridge is just for cards I'm here to tell you it's not! Please join me on Friday, June 12th at 7 pm where I'll show you how to transform one of the 5" x 7" Artfully Sent cards into an 8" x 10" canvas wall hanging!

The cost of the class is $10. Please RSVP no later Wednesday, June 10 via my Meetup group, Manassas Area Papercrafters. I hope to see you there!

~Michelle Battitori

P.S. Due to the nature of this class take-home kits won't be available. However, if I'd be happy to make a complete project for you for $15 (plus shipping if applicable). Projects will be be shipped/ready for pickup within 10 days. To order please message me with your address and I'll paypal you a total. 

Wednesday, May 20, 2015

Father's Day Gift Idea

On Saturday I had the pleasure of meeting a lovely group of women and show them how easy it is to create with our CTMH How-To Books!

Our hostess wanted a family themed layout to use as a Father's Day gift so I turned to the Make-It From Your Heart Volume 1 book  and the new Jackson paper to create this beauty of a page! We paired the layout with the Family Love Stamp set and used shapes from the Art Philosophy Cartridge.


We showcased the layout in our gorgeous Designed Decor Black Shadow Box. I love that the hinged, magnetic door makes changing the layouts so easy! And, the 1 1/4" frame depth means we can load up on our dimensional embellishments!


Thanks Jennifer for hosting a lovely evening!

If you would like to book a workshop or gathering with your friends please contact me to reserve your date! I'm more than happy to create a custom project perfect for you and your friends to enjoy. Summer dates are filling up quickly so make sure to book sooner rather than later.

Have a wonderful, and scrappy week!

~Michelle Battitori

Sunday, December 14, 2014

December Creative Club - Joy Wall Hanging


We went green for December's Creative Club using recycled box materials to make this adorable chipboard wall hanging!


Everyone had an opportunity to try out the Cricut Explore machine and Design Space. Combined with the Art Philosophy Cartridge we were able to complete this project pretty quickly (minus the wait time for our technical difficulties).


As a thank you to my guests I raffled off the stamp set we used during class. Congrats Dianna on your win! Now you can no longer say, "I never win anything!"

I feel so very blessed to have these women in my life! We've made quite a few projects in 2014 and I look forward to creating in 2015! If you are ever free the 2nd Friday of each month I'd love to have you join me!

Have a wonderful day!

~Michelle

P.S. If you are interested in instructions for this project they are for sale on my Etsy page, MichellesPaperMagic, under the Workshop Section.

Tuesday, November 11, 2014

Vinyl Glass Block Class


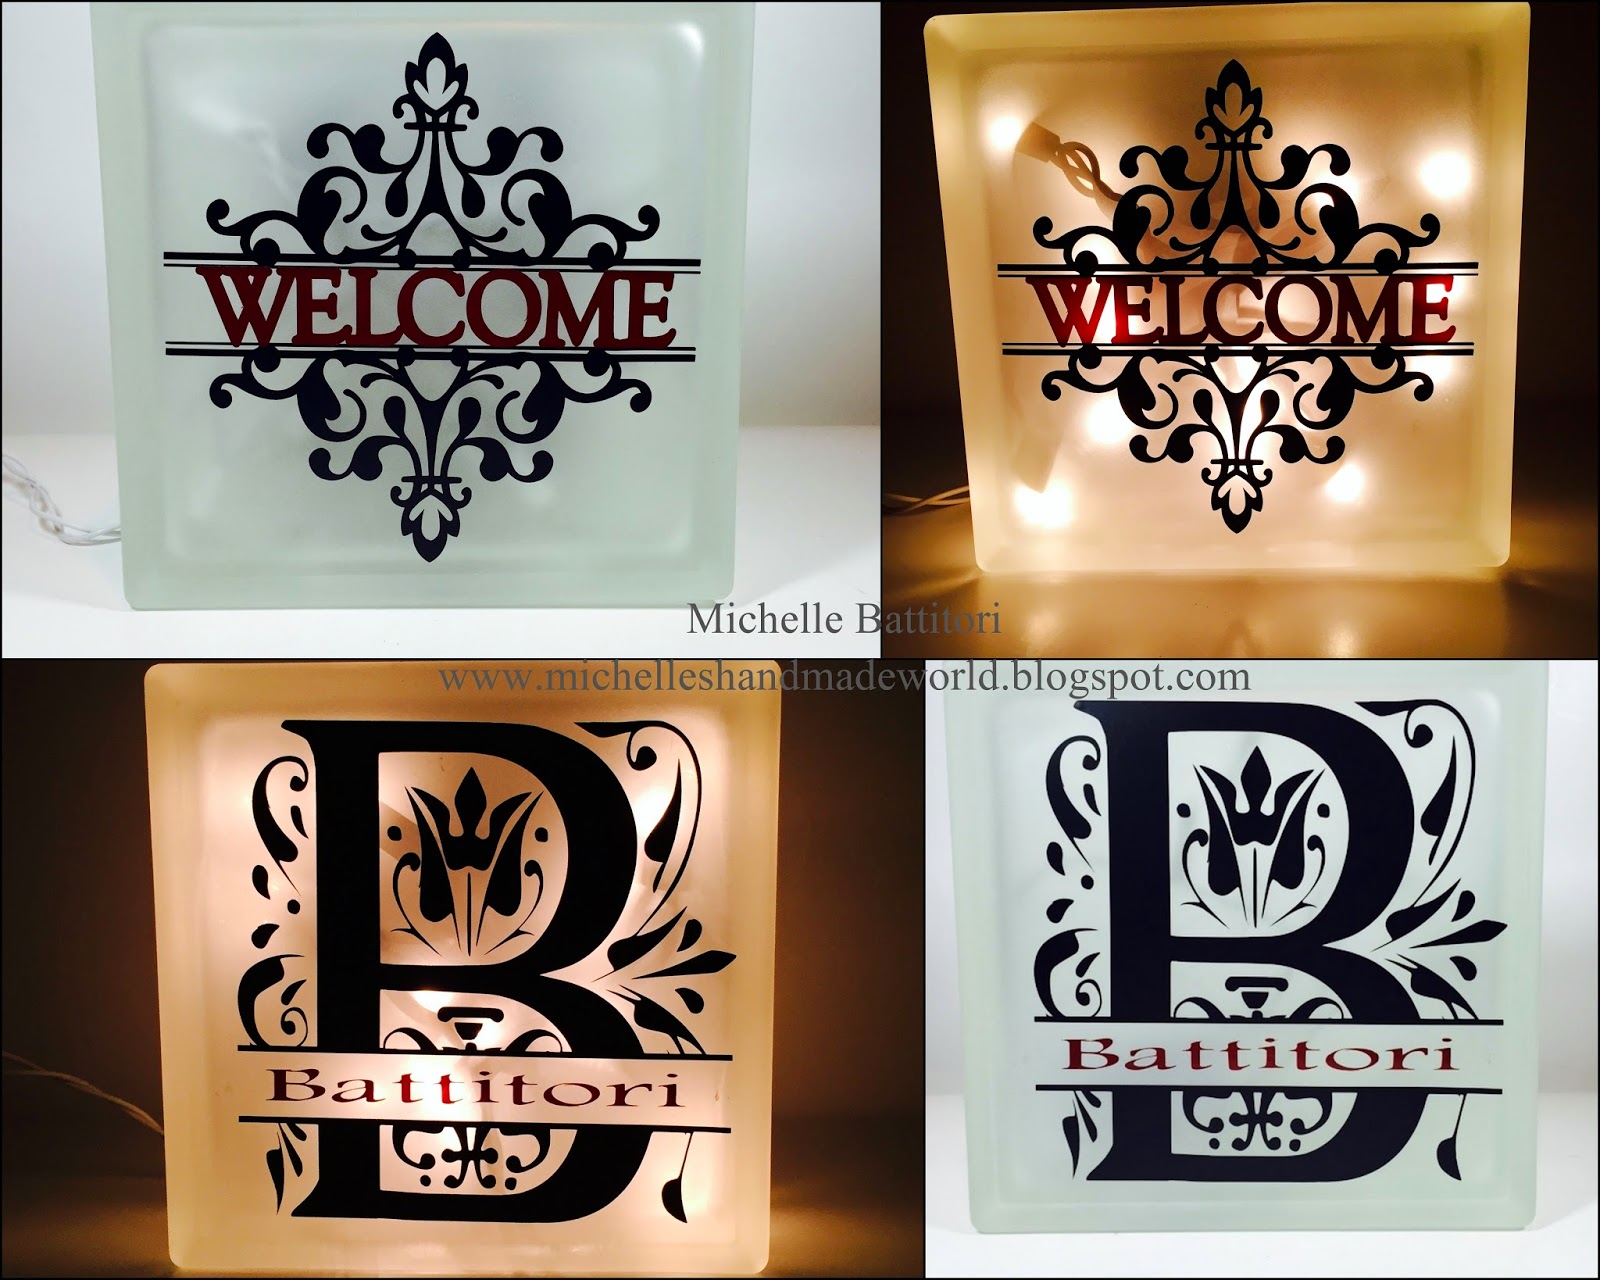
I've received a lot of positive feedback with my lighted glass blocks and am now offering it as a class! If you are in the Northern VA area please join me on November 22 at 10 am to make either the "Welcome Scroll" or "Split Monogram*" glass block!

These blocks are perfect additions to your home decor or make great gifts for family, friends, and teachers!

*The full alphabet is available for the monogram option. Please specify name preference when you RSVP. (I'm working on creating a photo of the full monogram alphabet and will edit this post when I have it available.)

This class will include the following:

  • (1) pre-frosted 8" x 8" glass block
  • (1) set of 20 plug in lights
  • pre-designed vinyl in your choice of either "Welcome Scroll" OR "Split Monogram" 
  • Transfer tape
  • Use of my Cricut Machine and Cricut tools
The scroll and monogram will be cut in black and you will have a limited selection of color vinyl colors to choose from for the interior words. 

To attend this class please RSVP at my Meetup Group, Manassas Area Papercrafters. You must RSVP by Wednesday, November 19 and pre-payment is required to attend. 

Hope to see you on November 22nd! 

~Michelle Battitori

Saturday, November 1, 2014

3D Paper Scarecrow - Fall Decor


I am totally in LOVE with my newest fall decoration! Can you believe it's made completely out of paper (aside from the buttons and hemp of course)??!! I can't wait to get him up on my mantle.


This adorable scarecrow was cut using the Leaves Are Falling design from Svg Cuts. It was super easy to cut thanks to my Explore and the fantastic written and video tutorial. I'm not going to lie...it took some patience (and some sticky fingers) to make but I'm really happy with the result!

Supplies Used (All CTMH unless otherwise noted):
Paper: Pathfinding B&T, Glacier Cardstock, Olive Cardstock, Blush Cardstock, Barn Red Cardstock, Cocoa Cardstock, Sunflower Cardstock, Black Cardstock, Bamboo Cardstock
Ink: none
Stamp: none
Other: Leaves are Falling SVG File (SVG Cuts), Hemp, Buttons (from my stash), Hot Glue, Liquid Glass

Have a wonderful day!

~Michelle

Sunday, October 26, 2014

Two-Sided Vinyl Glass Block - Halloween


I've been having a lot of fun playing with 8" x 8" glass blocks and vinyl lately! They were a big hit at the craft fair a few weeks ago. This is a custom two-sided block I made for a co-worker.


The "Trick-or-Treat" image was a free svg file I found online (I can't remember the site though). It's filled with lights so when you plug it in and it's dark it's kinda magical!


The "out of candy" side was created in Cricut Design Space using the CTMH Artbooking cartridge(for Boo and jack-o-lantern). I used Harrington font for "Happy Halloween" and Cricut Basics for the rest of the sentiment.

I hope she likes it!

I've made several of these blocks this season. Once you get used to playing with vinyl they come together pretty quickly. Here are a few of the others I've made (you can click on the image for a larger view):


Thanks for checking out my blocks! I'm looking forward to playing around with winter themed ones soon. I have a few ready to ship blocks available on my Etsy store if you are in need of a gift or home decor item. I also do custom work (kids, monograms, etc) so if you dream it I can probably make it!

~Michelle Battitori

Saturday, October 25, 2014

My First Outdoor Craft Fair

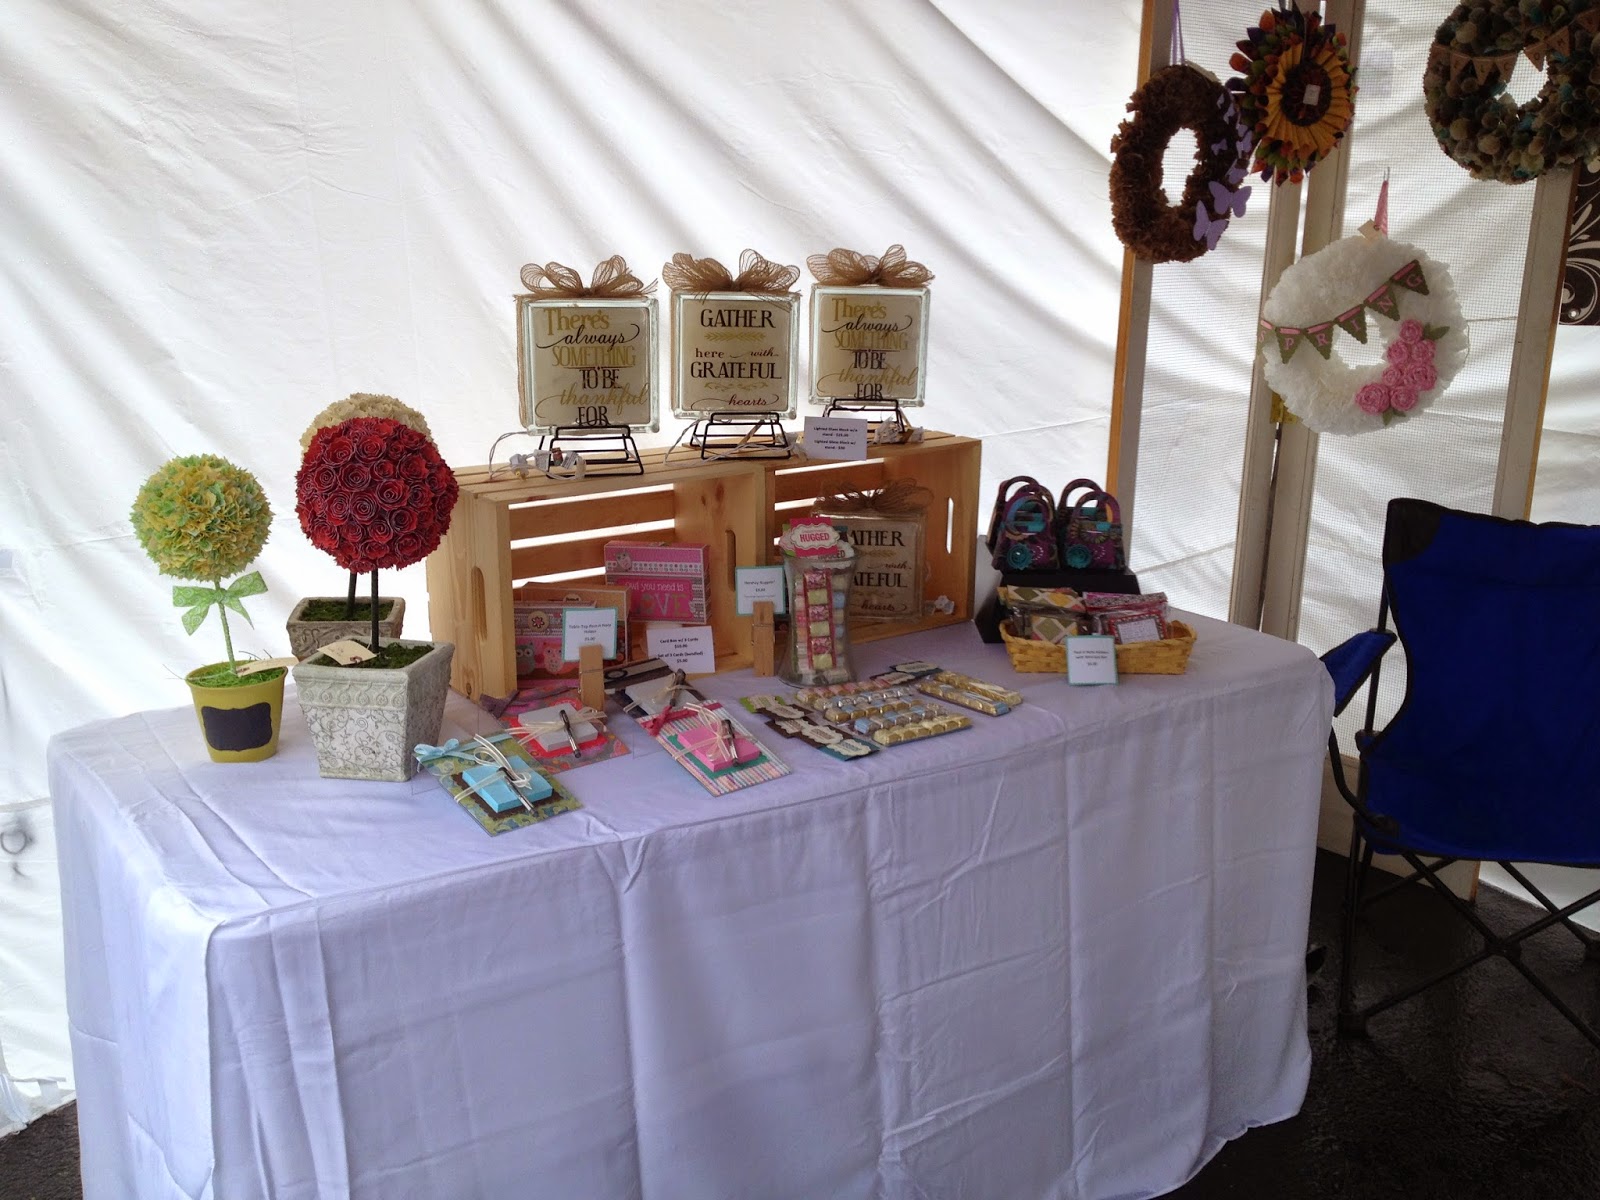
A couple of weeks ago I participated in a Pink Day Craft fair at a local nursery to support breast cancer research. This was my first outdoor craft fair and a completely different experience from the indoor fairs I've done in the past. For starters, the space was 10 ft x 10 ft, a much larger space than I was used to. Second, as a paper crafter I was a bit concerned over how my products would fair in the elements. Thankfully I was well prepared with extra adhesive just in case!


Unfortunately the weather didn't cooperate and the day ended up being rainy and cool but I was prepared thanks to canopy sidewalls I purchased from my local sporting goods store and weight plates I borrowed from my neighbor! There were certainly some scary moments for some of the other vendors when the wind picked up though.


This is the view on the left side of my tent. On this table I displayed my paper rose topiaries, fall light blocks, candy treats and prepared card box sets.


On the back wall I included old screen doors to hang my wreaths and framed products. I brought the wrought iron plant stand from my home to give customers ideas on how to display the topiaries and frames. It made the space feel homey!


The right side of my tent displayed my Halloween light blocks, cards, gift card holders, and more treats! My only regret of the show is that I didn't have electricity to show off how awesome the glass blocks are! They certainly were the hit of the show and have been very popular on my Etsy store, MichellesPaperMagic, too!

Overall I'm very pleased with how my space turned out and received many compliments from both crafters and customers! My husband and son were away for a baseball tournament but thankfully my parents were able to help with my other kids and booth setup...oh, and to bring me lunch and hot cocoa...it was cold!


The best part of whole day had to be the people I met and talked to. Here I am (the one in the hat) with a lady I chatted with for quite a long time. Turns out her daughter and I used to work together years ago. I can't remember how we figured that one out but it was certainly one of the highlights of the day for me!

The event was a lot of work to prepare for and made for a very long and tiring day but I would gladly do it again! There is just something about sharing my paper passion with others that makes me so incredibly happy! Oh, and the sales are a pretty good perk too!

I hope to see you at my next craft fair!

~Michelle Battitori

Wednesday, March 26, 2014

Coffee Filter Spring Wreath

In case you haven't noticed I've been on quite the wreath making kick lately!


My latest creation was made with items from my new favorite craft supply store -- The Dollar Tree!  I lucked out by finding the wreath form there (it's very hit or miss so when they are in stock take advantage) as well as a package of white coffee filters.


The flowers were made from pink chevron burlap ribbon I found on sale at my local craft store. The
leaves are from a retired felt accessory set from CTMH.


I wasn't planning on adding a banner to this wreath but my kids and hubby thought it needed something else. In the end I think they were right! The banner was cut with the Art Philosophy Cartridge at 2 1/2". The letters were cut at 1" using the Lollydoodle B&T paper. It matches perfectly with the burlap ribbon!


I can't find the exact tutorial I used but any search for "coffee filter wreath" will do the trick!

~Michelle

Monday, March 24, 2014

Scallop Paper Cone Wreath


What do you get when you take a 3" Scallop Punch, Skylark Paper, a Dollar Tree Book, and a hot glue gun?? Why this gorgeous cone wreath of course!


The scallop banner was cut with the Art Philosophy Cartridge (p. 59, Decorative Layer) at 2". I used my Party Pennants alphabet and Black Ink to stamp the letters and strung it with hemp.


This project was certainly a labor of love and I'm VERY happy with the way it turned out (my burnt fingertips may say otherwise though). This one is going to be hard to give up at the Spring Craft Fair I'm participating in next Saturday!

This wreath was inspired by this pin on Pinterest (tutorial can be found on the blog post). I have one more wreath to share later this week.

Have a wonderful day!
~Michelle


Saturday, March 22, 2014

The Everything ABC Blog Hop - F

Welcome to the Everything ABC Blog Hop!


For this hop we will be featuring the letter 'F'. This may be the name of a paper, a stamp set or an embellishment, whatever the artist has chosen as their "F" embellishment will be featured in their post. For this hop I've created a canvas wall hanging trio using the Family Love Stamp Set


If you've just come from Jenny's Blog then you are on the right track! This hop is a great big circle but if you happen to lose your way please visit Linda's Blog, Scrappy Therapy, for a complete list of hoppers.


I was inspired to make this wall hanging by CTMH Artwork from the 2013 Autumn/Winter Idea Book (tip: never throw out the Idea Books...they have sooo much beautiful artwork. You never know when you'll need to feel inspired).

Panel 1
I started out by using 3 of the My Creations Canvas Displays and one sheet of Skylark B&T paper. Each base piece was cut to 5 5/8" x 5 5/8" and inked with Brown Bag Ink.


For the first panel I stamped one of the images in the stamp set using Lagoon Ink. I accented the panel with a strip of Sweet Leaf Cardstock that I ran through my embossing machine with the new Quatrefoil Embossing Folder. I finished it off with some Silver Glitter Paper and Metal Flowers.
Panel 2
I kept the center panel very simple by using the reverse side of the B&T. I stamped another sentiment from the Family Love Stamp Set and layered onto more Silver Glitter Paper. I popped the sentiment up with some 3D Foam Tape for added dimension.


For symmetry I repeated the banner accents and embossing on the 3rd panel.
Panel 3
Instead of stamping another sentiment I opted to use some of the accents on the stamp set. I inked them in Sweet Leaf Ink and used my sponge dauber to add a touch of Brown Bag Ink to the center. I hand cut and layered them with 3D Foam Tape.  I finished this canvas with more Glitter paper and Metal Flowers!


I think this wall hanging will make a great addition to any family room or bedroom! This trio can also be hung vertically! If you want to hang it up I suggest hot gluing ribbon to the back or using some 3M adhesive.


Thanks for stopping by and checking out my project!Now it's time to check out what Shalana's made! 

If you'd like to make this project for yourself here's a list of supplies used (all CTMH unless otherwise specified):

Paper: Sylark, Kraft Cardstock, Lagoon Cardstock, Sweet Leaf Cardstock, Black & Silver Glitter Paper
Ink: Sweet Leaf, Lagoon, Chocolate, Brown Bag
Stamp: Family Love
Other: My Creations Canvas Display, 3D Foam Tape, Quatrefoil Embossing Folder, Metal Flowers, Scissors, Sponge Dauber

In case you get lost along the way please go to Scrappy Therapy for a complete list of participants! 

~Michelle
P.S. I'm giving away a free stamp set on March 31! Please visit THIS POST for details.

Saturday, January 25, 2014

Everything ABC Blog Hop - "B"


Welcome to the Everything ABC's Blog Hop!

For this hop we will be featuring the letter 'B'. This may be the name of a paper, a stamp set or an embellishment.  I chose to use the versatile MyCreations Bracket Frame...with a banner for an extra shot of 'B.'

If you have just hopped onto my blog, please start at the beginning at Linda's blog ~ Scrappy Therapy. If you came from Lauren's Blog then you're on the right track!


I started out by cutting the bracket shape with my Cricut Art Philosophy Cartridge using Cricut Craft Room to re-size it to 10.95" x 10.95". Once cut I traced the square opening and trimmed with a ruler and X acto knife. The paper, Ivy Lane, is from our up and coming Spring/Summer Idea Book available Feb 1 (message me if you would a copy).


Since I wanted to showcase the photo in the frame I kept my embellishments to a minimum. I colored the Color-Ready Canvas Alphabet with my Smokey Plum alcohol markers and covered the Dimensional Element Heart with coordinating paper from the Ivy Lane pack. The only stamping was the "Love" sentiment from the Art Philosophy stamp sets.


To decorate the outside of the frame I cut the banner title from the Cricut Artbooking Cartridge (p. 60) at 7". I also cut rosettes from the Artbooking Cartridge in sizes ranging from 3 1/2" to 6 1/2" (page 60) and finished it off with black Sparkle Fourishes! I'm still debating whether or not I want to add leaves by my rosettes in the lower right corner...what do you think?


Your next stop on our Everything ABC'S blog Hop is Catherine's blog. Thanks for checking out my project!

Project Recipe (all CTMH unless otherwise noted):
Paper: Ivy Lane (X7178B), Hollyhock Cardstock, Blush Cardstock, Smokey Plum Cardstock
Stamps: Cricut Art Philosophy (D1498)
Ink: Black (Z2105), Hollyhock (Z2128), Smokey Plum (Z4147)
Other: MyCreations Bracket Frame (Z1797), Cricut Artbooking (Z1906), Cricut Art Philosophy (Z1686), Color-Ready Canvas Alphabet (Z1777), Dimensional Elements Heart (Z1735), Sparkle Flourishes - Black (Z1745), X-Acto Knife, Ruler, Glue Dots, Hot Glue Gun

Here is the complete lineup in case you get lost along the way :)

6. Michelle Battitori (that's me) - Michelle's Handmade World