Showing posts with label Teacher Gift. Show all posts

Saturday, February 6, 2016

Share the Love Blog Hop

Welcome to the Share the Love Blog Hop! Today, approximately 27 CTMH consultants will be showcasing projects made with the Share the Love stamp set! If you've arrived from Melinda Everitt's blog you are on the right track. Melinda's post also contains a list of all participants so if you get lost on the hop make sure to go back to her post.


I was very inspired by the "share the love" sentiment and decided to create a set of 12 note cards and box holder! These cards are perfect to add sweet little notes and encouraging words to my kids and husband's lunch boxes.


The project was created in Cricut Design Space using images from the Artiste and Artbooking Cartridges. I resized them to be 4" x 5" and stamped them using a variety of techniques such as masking and rock-n-roll. I also used the backside of the heart balloon image to create a fun and different look!


Aside from the awesome projects you'll see with this stamp set you should note it's also pretty special to CTMH. Not only is it  filled with adorable icons and lovable sentiments perfect for your stamp collection, but CTMH will also donate $7 USD of the proceeds from each set sold to Operation Smile, an amazing organization that provides surgeries to repair cleft lips and palates for children all over the world! If that's not "sharing the love" I'm not sure what is!


This stamp set is only available until February 29th. To order yours please contact your CTMH Consultant or visit my webpage, www.michellebattitori.ctmh.com. Thank you for checking out my project. Now it's time to hop to Brenda Lapp's blog to see what's she's created!

~Michelle Battitori

Project Recipe
Stamps:Share the Love Stamp Set (CC1060)
Ink: Bamboo Ink (Z2103), Pomegranate Ink (Z2653), Poppy Ink (Z2652), Eggplant Ink (Z2647), Black Ink (Z2105)
Paper: Sangria Paper Packet (X7199B), Colonial White Cardstock (1388), Chocolate Cardstock (X5643)
Other: Red Enamel Heart (Z2009), Shimmer Trim-Coral (Z3088) Cricut Artiste Cartridge (Z3170), Cricut Artbooking Cartridge (Z3169)


Thursday, October 1, 2015

October SOTM Blog Hop - Twinkle

Welcome to October's SOTM blog hop! If you have arrived from Jacquelin Green's blog you are on the right track! This month over 45 CTMH consultants will be featuring artwork with the October Stamp of the Month set, Twinkle.

Today I made a clean and simple card and treat box set. For the card I curved the string to fit my card front and stamped it twice with black ink. Then, I went along and stamped the light bulb outline in black ink. I followed it up with the fill bulb using a variety of ink pads that coordinate with the Whimsy Paper Fundamentals pack.


The gift box, tag, leaves, and flowers were all cut with the Cricut Artiste cartridge using the Enchantment Paper Fundamentals pack. I love that this box requires no adhesive to assemble! Since the paper is so beautiful I kept the box simple and just accented it with some small flowers and leaves also cut from the Aritste cardstock and Enchantment Fundamentals pack. Now all I have to do is fill it with some awesome little baked goodies and gift it to one of my awesome neighbors!

Now please continue to Michelle Jones's blog to see what she's created! If you happen to come across a broken blog link please visit Melinda's blog for a full list of participating consultants.

Thanks for stopping by!
~Michelle Battitori

Card Recipe:
S1510 Twinkle Stamp of the Month
Z3126 Enchantment Paper Fundamentals
Z2105 Black Ink
Z2649 Peacock Ink
Z2651 Saffron Ink
Z2648 Sapphire Ink
Z2647 Eggplant Ink
Z2652 Poppy Ink
1385 White Daisy Cardstock

Gift Box Recipe:
S1510 Twinkle Stamp of the Month
Z3126 Enchantment Paper Fundamentals
Z2105 Black Ink
Z2652 Poppy Ink
1385 White Daisy Cardstock
1386 Black Cardstock
Z3170 Cricut Artiste Cartridge
Z1752 Clear Sparkles


Tuesday, April 28, 2015

May Creative Club

The next Creative Club is scheduled for Friday, May 8th at 7 pm. We'll be making this adorable mini-album/card courtesy of my 2nd upline Janene Wawro.

This mini has an optional gift card holder and is perfect for a last minute Mother's Day, Teacher Appreciation or other special occasion gift. Or, simply keep it as a mini to document a fun activity in your life. The choice is yours!

I'll show you how to stamp the adorable floral wreath from the Happy to be Friends stamp set as well as highlight it with some faux stitching.

To RSVP please visit my Meetup Page, Manassas Area Papercrafters.

Hope to see you on the 8th!

~Michelle Battitori

P.S. Take-home kits are available for purchase. Message me for details!

Tuesday, November 11, 2014

Vinyl Glass Block Class


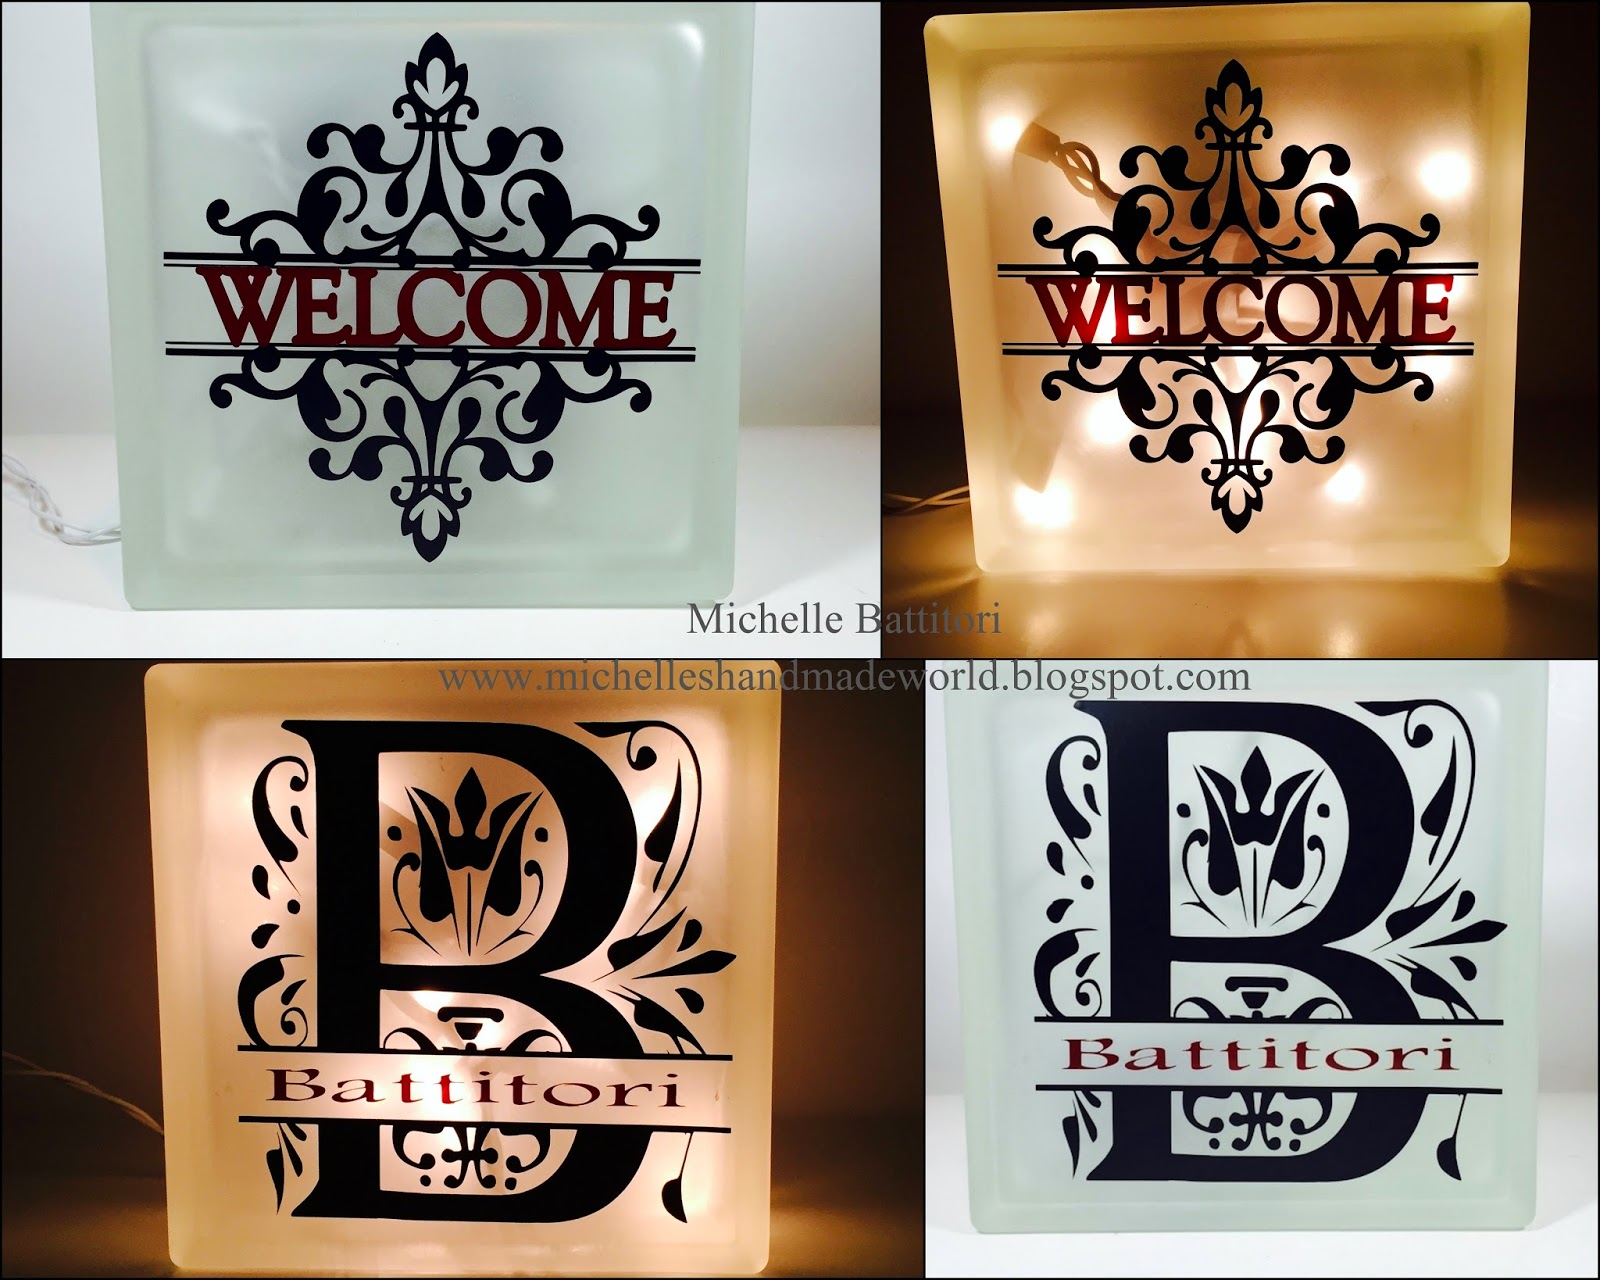
I've received a lot of positive feedback with my lighted glass blocks and am now offering it as a class! If you are in the Northern VA area please join me on November 22 at 10 am to make either the "Welcome Scroll" or "Split Monogram*" glass block!

These blocks are perfect additions to your home decor or make great gifts for family, friends, and teachers!

*The full alphabet is available for the monogram option. Please specify name preference when you RSVP. (I'm working on creating a photo of the full monogram alphabet and will edit this post when I have it available.)

This class will include the following:

  • (1) pre-frosted 8" x 8" glass block
  • (1) set of 20 plug in lights
  • pre-designed vinyl in your choice of either "Welcome Scroll" OR "Split Monogram" 
  • Transfer tape
  • Use of my Cricut Machine and Cricut tools
The scroll and monogram will be cut in black and you will have a limited selection of color vinyl colors to choose from for the interior words. 

To attend this class please RSVP at my Meetup Group, Manassas Area Papercrafters. You must RSVP by Wednesday, November 19 and pre-payment is required to attend. 

Hope to see you on November 22nd! 

~Michelle Battitori

Thursday, October 9, 2014

Journaling Cards Box Gift Set


I've been busy prepping for an upcoming craft fair this Saturday, October 11, and this is one of the items I'll have available for sale.

I decorated the Journaling Card Box with retired Lollydoodle papers and coordinating MyStickease Assortment along with some Shimmer Trim.

The cards were designed using the Lollydoodle Card Workshop On The Go Kits. While this set isn't available anymore you can make a similar project using any of the Card Wokshop On The Go Kits found HERE! The kits make it super easy since they include cutting directions, a stamp set, paper, and accessories!

I hope this inspires you to make something fun today. I look forward to sharing some of my other projects in the next few weeks.

~Michelle Battitori

Saturday, March 15, 2014

Technique Blog Hop - Pattern Switch

Welcome to our Technique Blog Hop! This month we are highlighting Pattern Switch! What is a pattern switch you ask? It's taking a scrapbook layout and converting it into a card or taking a card and making it a layout. For this hop we are using the Spring/Summer Idea Book for our switch inspiration.

This blog hop is a great big circle so you can start wherever you want and continue through to see all the fabulous artwork incorporating this technique. 

If you are coming from Judy's Blog, you are on the right track! 


I was inspired to make a card from the June Stamp of the Month layout, Kaboom, featured on page 15 of the Idea Book. Actually, if you want to get technical I'm not making a card...I'm making a post-it-note holder for an upcoming craft fair! The cover is kind of like a 3 x 3 card, right???

Since my card is a fraction of the size I wasn't able to include every element but I did keep the general color scheme and overall layout. I opted to make the background Slate (instead of White Daisy) so my colors popped a bit more but I did keep the faux stitching around the edges.

Instead of a photo I opted to use a speech bubble from the Artbooking cartridge (p. 79. Shift + Photo Mat 2, at 2"). I stamped it in Goldrush Ink using the coordinating stamp set.

Supplies Used (All CTMH unless otherwise noted):
Paper: White Daisy Cardstock, Skylark B&T, Slate Cardstock
Ink: Goldrush
Stamps: My Life (Cricut Artbooking Bundle)
Other: Cricut Artbooking Cartridge, Mini Gel Pen (Staples), Chalk Board Marker, Mini Glue Dots, Post-It Note Holder (Staples), Shimmer Trim (Red)

Thanks for checking out my post. If you'd like to make a similar project here's a link to the instructions I used: Post It Note Holder

Now please hop onto Terry's blog to see what she created!

~Michelle

Thursday, February 6, 2014

First Team Meeting - A Gift


Last year was a big year for me as I had several girls join my team, The Handmade Brigade. About a week ago we had our first team meeting at the local coffee house. We introduced ourselves, celebrated our achievements and went over some business and organizational tips to help us on our journey.


As an appreciation to my newest members I made each of them an altered composition book (inspired by this one from Shirley Ross).  I kept my design the same for all the books only changing the papers and embellishments.


The bracket shape comes from the Art Philosophy Cartridge (p. 55, <Rctngle7>). I cut two pieces, one at 2 1/4" and one at 2 1/2" for matting. The sentiment comes from a previous CTMH and is a perfect reminder for my team. I hope they enjoy their gifts!


Of course in my excitement I realized I forgot to take a team picture! Oh well...I guess we'll get to that next time.

If you are interested in learning more about joining CTMH or my team please visit THIS PAGE.


~Michelle

Thursday, January 9, 2014

Updated January Club Project...And I L-O-V-E it!


Well, my project for January was all ready to go but a shipping delay means my extra supplies won't be here in time for club this Friday, Jan 10.

So, what's a girl to do? I could have easily cried myself into a panicked frenzy or I could do what any resourceful crafter (because really all crafters are pretty resourceful in my opinion) would do and raid my stash to come up with a new project!

This month I'll show you how to transform your Christmas paper into a fun Valentine bag and pop-up card! Both projects are courtesy of the AMAZING Artiste Cricut Cartridge...no fussy cutting here!

As of today I have 4 spots left so if you are free I'd really love to have you attend. Start time is 7 pm and the cost is $5. I will also ship kits to out-of-towners and local friends that can't make the class(shipping is extra). Please use the link below to purchase.
 
Delivery Options


Kits will include:
  • Printed step-by-step instructions with lots of photos
  • Pre-cut paper
  • Pre-stamped images
  • 17" of Cranberry Grosgrain Ribbon (or similar product)
  • 1 card with envelope


Thursday, June 20, 2013

End of Year Teacher Gift


School ended on Tuesday and I've been fighting off some form of the flu. I'm a little late in posting our end of year teacher gifts but at this point I'm just glad the teachers actually got them before the end of the year!  Aren't they adorable??!!

The popcorn box was cut from the Artiste Cartridge with the fit to page feature (size is 4 1/4"). The movie night sentiment was cut at 1". The film strip was cut at 1 1/2"


To package the gift I simply added them to a cellophane bag wrapped with ribbon. Contents of the gift include a bag of kettle corn, Toblerone Candy, a movie gift card, and of course the Milk Duds!


Hope the teachers like it!

Supplies used (all CTMH unless otherwise noted): 
Paper: Tommy B&T, Black Cardstock, Honey Cardstock
Stamps: None (can you believe it??)
Ink: None
Other: Glue Dots, Cricut Artiste

Saturday, May 11, 2013

Teacher Gift: Lollipop Pinwheel Garden


This was another fun project to make with the Cricut Artiste Cartridge. I used the flower pot shape on page 54 of the cartridge and cut it at 2 1/2".


I filled the pot with some Floral Support found at the Dollar Store and decorated the lollipops with May's Stamp of the Month, Pinwheels. The Pinwheel shapes were also cut with the Cricut Artiste cartridge at 2".

For added stability in the "planters" I added some red marbles I had in my stash. I finished off each planter with a simple bow and voila, another quick and fun teacher gift done!

If you'd like to make this project but don't own the Artiste Cartridge you can get it HERE!

Thursday, May 9, 2013

Teacher Gift: Post-it-Note Holder

I like projects that are both functional and cute and I'm hoping our teachers do as well.

This project was inspired by my friend, Amy. She's so creative and is a teacher herself.

This project was really inexpensive to make and is a great use of scraps. The acrylic frame came from the Dollar Store. These would also make great office and co-worker gifts!


Here's the frame from the side! Hope the teachers like it!

Tuesday, May 7, 2013

Teacher Gift: Note Card Set


It's that time of year to give a little thanks to our teachers! To kick off Teacher Appreciation Week my first project is a Thank You note card set.

For the Male Teachers!
The holder was super easy to create with the help of the Cricut Artiste cartridge. Since I had several of these to make I kept the cards pretty simple. The bracket was also cut with the Artiste cartridge and stamped with the coordinating Perfect Fit Frames 2 stamp set. The sentiment is from one of my faves, Salutation Seals.

For the Female Teachers!

Sunday, April 14, 2013

Party Favor Ideas!!


Whether you use one Cricut®-cut piece or several, you can create cute party favors and decorations using your Artiste cartridge. Combine your Cricut® pieces with unique stamping techniques and you have projects that will knock your guests’ socks off! Want some recipes and tips for how to make this adorable artwork? Below are instructions for creating two pieces from the “Clearly the Best: How to kiss—with stamps” episode. Combine the Cricut®-cut pieces for these projects with the kissing stamping technique and you have a stellar 3-D item! 


Party Banner
Stamp set of your choice
X5668 Honey Cardstock
X5764 Pear Cardstock
1272 Cranberry Cardstock
Z2197 Pear Exclusive Inks® Pad
Z2163 White Daisy Exclusive Inks® Pad
Z1751 Baker’s Twine Harvest Assortment
Z1311 1¼" Circle Punch

Cricut® Shapes:
Artiste
1" Shift+3D Object <J> (cut 56, p. 57)
Art Tip! This banner only uses one type of Cricut® shape, but the finished product is still stunning. Use stamp kissing to randomly stamp across the pieces using the stamp set of your choice. Score with the help of the Cricut®-cut score lines on the shape and piece together to create little globes. Tie together with baker’s twine and voila!


Owl Miss You Bag
1385 White Daisy Cardstock
1292 Crystal Blue Cardstock
X5668 Honey Cardstock
X5930 Slate Cardstock
Z2162 Honey Exclusive Inks® Pad
Z2117 Crystal Blue Exclusive Inks® Pad
Z1349 Shimmer Designer Brads
Z1752 Sparkles Clear Assortment
Z1311 1¼" Circle Punch
Twist Ties
Thread

Cricut® Shapes:
Artiste
4½" 3D Object <Hallween> (p. 77)
4½" Shift+3D Object <Boo> (cut 2, p. 77)
1" Shift+Accent 2 <A> (p. 51)
Art Tip! This project uses many Cricut® shapes and all the pieces coordinate so nicely for an adorable finished product. Use the Artiste assembly booklet to put the bag together and then add the embellishments. The feathers are created with punched circles that are stamped using the kissing technique; however, if you don’t have the circle punch, you can easily make these using the Cricut as well. The eyes were created using Shimmer designer brads, but you can use any large brad or button to create the same look. Finish with the “owl miss you sentiment” for a special touch.
Be sure to share these tips with your customers! The owl bag and party banner are great projects to create at a workshop or club. 

It’s a Cricut® party! If you'd like to purchase any of the items needed to make these adorable projects please visit my website HERE.

Saturday, May 12, 2012

Teacher Appreciation Day 5 - Fun Day


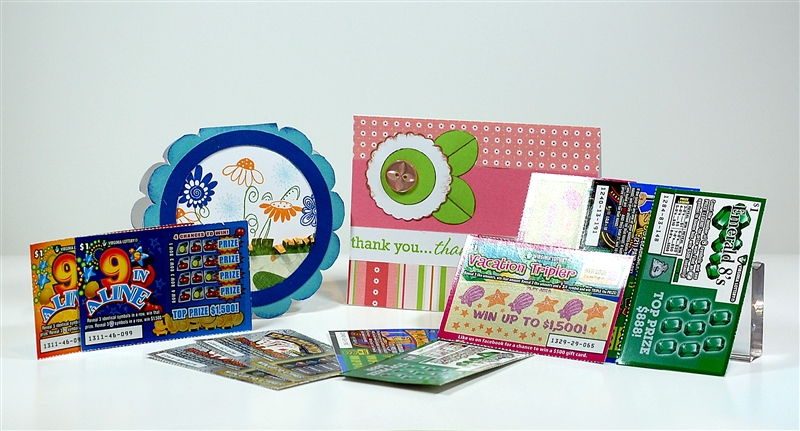
We have been very fortunate to have had some amazing educators so we wanted to do something fun! I went through my stash of cards and wrote a special note from me and my husband. Then, we stuffed the cards with scratch-off lottery tickets. Hopefully the teachers will enjoy it and win some extra money! Lord knows they deserve it!!!

Thursday, May 10, 2012

Teacher Appreciation Day 4-Sweet Treats


Days 1 and 2 covered breakfast and drink so it's only fitting that one day took care of something sweet! Today I made paper sour cream containers filled with miniature chocolate candies. Each container holds 4-5 miniatures. This was a fun and easy project and one the kids could easily do with a little instruction.

The tutorial for these quick containers can be found HERE.

Supplies used (all CTMH unless otherwise noted):
Paper: Magnifique (retired), Chocolate Cardstock, Lagoon Cardstock
Stamps: Thank You
Ink: Lagoon
Other: 2" Scallop Circle Punch, 1 1/2" Circle Punch, Organdy Ribbon, Natural Hemp, Tacky Tape

Wednesday, May 9, 2012

Teacher Appreciation Day 3 - Bookmark Card


We are halfway through Teacher Appreciation Week. The theme for my daughter's kindergarten class is "Fantastically Awesome Readers" so the kids and I made bookmark cards. I like that the bookmark is perforated making it easy for the recipient to tear off and use. Instructions for this card can be found HERE.


I kept life simple and made three of the same card. I used the May Stamp of the Month, Friendship Bouquet, colored it in with my watercolor pencils then blended it with my waterbrush. As I was coloring my daughter kept saying, "Boy mom, you are a messy colorer!" Considering she won a coloring contest this year she's probably right!


The sentiment for the bookmark came from a now retired Workshop On The Go. I thought it was quite fitting for the theme. To finish the inside I incorpated my kids recent school pictures as well as their note as to why their teacher is the best!

Supplies used (all CTMH unless otherwise noted):
Paper: Olive Cardstock, Sunflower Cardstock, Colonial White Cardstock
Stamps: May SOTM, Wings WOTG (retired)
Ink: Autumn Terracotta, Goldrush, Desert Sand
Other: Watercolor Pencils, Waterbursh, 3D Foam Tape, Cricut Art Philosophy Cartridge, Dark Chocoloate/Colonial White Ribbon


To see the full Stamp of the Month set or to purchase your own go HERE.

P.S. I'm having a blog give-away! Leave a comment on THIS post for a chance to win the Dotty For You Paper Pack for free!

Tuesday, May 8, 2012

Teacher Appreciation - Day 2

Today's teacher gifts use the Art Philosophy Cartridge again to make a water bottle hanger to hold Crystal Light Packets.


 I cut each door hanger at 10 1/2"using Shift + Font Layer + <Star2> (p.25). After a few folds and a couple adhesive lines it was done! The front B&T paper piece is cut at 2 5/8" x 2 7/8" and the stamped shape was cut at 1 3/4" <Square5> (p.63).

To add a little more interest I made a pinwheel flower to add to the top of the hanger and decorated the water bottle in coordinating papers. Sorry the pictures are so bad...I had to take them quick this morning so the kids could get them to school. Awe...the life of a procrastinator!

Supplies used (all CTMH unless otherwise noted):
Paper: Bamboo Cardstock, Miracle B&T
Stamps: March 2012 SOTM - Thoughtful Tidings, Miracle WOTG
Ink: Chocolate
Other: Cricut Art Philosophy Cartridge, 3D Foam Tape, Kraft Borders, Glue Dots, Blue Assortment Buttons


P.S. I'm having a blog give-away! Leave a comment on THIS post for a chance to win the Dotty For You Paper Pack for free!

Monday, May 7, 2012

Teacher Appreciation Day 1

It's that time of year to honor the wonderful people who teach our children. For many of us our children's teachers spend more time with our kids than we do. I truly believe each and every teacher deserves recognition for their time and endless energy they give each day.


Today's gift is all about nourishment. Since breakfast is the most important part of the day my kids our giving their teachers chocolate chip muffins. Yummy!! I wanted the packaging to be simple but meaningful so I turned to the Art Philosophy Cartridge to create these cute little take-out boxes. I literally whipped five of these puppies up in under an hour...including stamping time and fighting with a very persistent cricket (unfortunately the cricut won and is nowhere to be found). If you are adding food to these boxes like I did make sure to add some wax or parchment paper first. Each box holds 3 mini-muffins.

Supplies used (all CTMH unless otherwise noted): 
Paper: Florentine B&T, Sonoma B&T, Smokey Plum Cardstock, Colonial White Cardstock, 
Stamps: March SOTM
Ink: Chocolate, Sunflower, Cranberry, Olive
Other: Cricut Art Philosophy Cartridge, White Floss, Metallic Brads, 3D-Foam Tape


P.S. I'm having a blog give-away! Leave a comment on THIS post for a chance to win the Dotty For You Paper Pack for free!