Tuesday, May 31, 2011

Last Day for 1/2 Price Consultant Kit!!

Today, May 31, is the last day to take advantage of the 1/2 price Consultant kit AND get a free You & Me scrapbook kit!

There are so many reasons to consider this opportunity. Not only are you getting over $250 in products for only $65 but you will also be able to earn fabulous discounts on all CTMH products and specials. Plus, you get to choose what's in your consultant kit so you get only the products you'll love!

I know you are probably saying, "If only I had the time..." or "I don't want to do parties..." and the good news is that you don't have to!! There are so many options for you to pick from -- hobbyist, club coordinator, career consultant, junior consultant...the list goes on and on! You can see all the options available by going HERE or clicking the Join My Team page above.

On a personal note, I joined CTMH while I was pregnant with baby #3 and working full-time. I really only joined for the discounts but happened upon a few wonderful girls that love making cards. At this point in my life I'm more of a club coordinator with the occasional home party and workshop thrown in. I still work full time and love that I can make CTMH work around my schedule. I choose when and how much and I love it! And I know that at some point, when life allows, I will be one of those lucky ladies who will earn a fabulous cruise for free.

I'd love for you to join me on this journey. I can guarantee you that whatever your goals are I will help you get there! I am here for you as a CTMH leader but most importantly I will be with you every step of the way as a friend!

Email me at handmadefromtheheart@gmail.com or call me 703-307-9808 for questions or more information.

Go HERE to sign up today!

Monday, May 30, 2011

I Am...

If you are like me you spend most of your time behind the camera taking photos of others. So, when I turned 30 (3 years ago!) I decided I wanted to document me at that moment.


I love the way the layout turned out! The pictures were fun and I was able to highlight my cake, a 3 tier chocolate cake with mocha whipped cream frosting and nuts on top. YUM!!

I've been enjoying this cake since I was a little girl. Thanks Mom for making my special cake every year and for always making my birthdays special!
Supplies used (all CTMH unless otherwise noted):
Paper: Tickled Pink (retired), White Daisy Textured Cardstock
Stamps: Authentic, Alphabet
Ink: Blush, Hollyhock, Crystal Blue
Other: Ribbon Slides, White Daisy Brads

Saturday, May 28, 2011

You & Me-Time To Celebrate

Last October my dad turned 60 and for the last few years he insisted all he wanted was a full family portrait. No big parties, nothing too fancy just a photo of his kids and grandkids. Should be an easy request right?

Well, seeing as how my sister and her family live in Colorado and my brother-in-law was on the list for deployment getting all of us together was a challenge. But, my sister and I managed to surprise him at Thanksgiving with a family photo shoot. Two of my kids were sick and my mom was recuperating from surgery but we did it!

To capture this celebration I used the May special, You & Me Kit. I wasn't sure how the red outfits would look with the pink in the paper but I think they coordinated beautifully! He was so excited and I'm glad we were able to give him the one thing he asked for. Well, he actually asked for more grandkids but I'm pretty sure he's out of luck on that request!

Thanks for looking . Don't forget that the You & Me Kit is only available until May 31 or while supplies last! Don't miss your chance...go here and get your kit today!

Tomorrow I will share a layout all about me!!

Supplies used (all CTMH unless otherwise noted):
Paper, Stamp, & Accessories: You & Me Kit (CC1012)
Ink:

Friday, May 27, 2011

Take Me Out To The Ball Game...

Admit it. You are singing the rest of that song in your head. I know I am!! Baseball is a huge part of our family. I've been playing softball since I can remember (I even played until I was 6 months pregnant with baby #2) and my son, Lucciano, has been playing T-ball/baseball since he was 3. So, when he turned 7 it was only fitting that we had his birthday party with the Potomac Nationals, a minor league affiliate for the Washington Nationals.


The party was a blast! We had a pre-game picnic and got autographs from some of the players. Then, we watched the game while the staff brought us cupcakes, ice cream and drinks! During the game they even brought Luc on the field so the stadium could sing Happy Birthday! He loved it! When the kids got a little antsy we took them to the the moon bounces behind the game and then spent our Birthday Fan Bucks at the Fan Zone shop. Just about all the kids purchased baseball cards! After the game we watched fireworks and the kids that stayed (it was a very long game) got to run the bases! Just like the title says...it was a happy day and we enjoyed!


So, how did I make this layout? Well, I used the Fanfare paper pack (you will be seeing a lot of this my friends because I adore it!) and the coordinating Fanfare MyStickease stickers. Although I have collected my fair share of stickers these really are the only ones I like to use. They are cardstock quality and the "stick" on them is fabulous. Each package comes with two 6" x 12" sheets of various images/titles. The best part though is that these stickers coordinate perfectly to the paper packs. It makes my pages come together really fast and these days I'm really all about faster, simpler, and easier!  To finish, I did add a couple of buttons and some scrap ribbon but that's it! No stamping on this layout.

Thanks so much for looking. Go here to purchase your Fanfare items today!

Supplies used (all CTMH unless otherwise noted):
Paper: Fanfare (X7138B), White Daisy Cardstock
Other: Fanfare My Stickease (X7138C), Buttons - Blue Assortment (Z1371), Cranberry Ribbon, Colonial White Waxy Flax

Thursday, May 26, 2011

1st B-Day Celebration

This week is my birthday and I'm celebrating by sharing birthday layouts of me and my family. I love scrapping birthday layouts. Generally everyone is having a great time and remembering the funny things that happened during the parties always brings a smile to my face!


Today I'm sharing my little Gino's first birthday. You probably already recognize him (and the shirt) from the Follow Your Dreams Layout I shared earlier. The party started out a little rough considering our guest of honor decided to take an extra long nap (like 40 minutes into the party) and when we finally woke him up he was miserable. To be fair he was getting over a cold.

Left Page

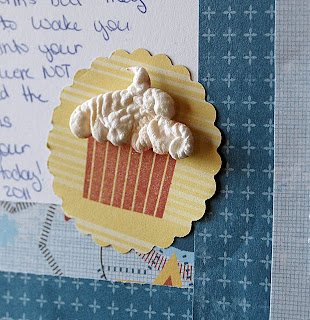
Quite honestly the only things that made him happy that day were the cake and balloons! He spent almost an hour in his high chair devouring the huge piece of cake we gave him! I really wanted to capture the highlights of his party with embellishments so you can see I added some button balloons and a frosty cupcake to the left page of this layout.

Right Page

For the balloons I started out by stamping balloons on the layout using Indian Corn Blue Ink and then topping each one with a button threaded with white thread. I used the thread to hold the balloon bouquet together and held them down with a stamped start popped up with 3-D foam tape.

For the cupcake, I stamped the wrapper using Cranberry Ink onto a punched 2" scallop circle. I also stamped the cupcake top and used Liquid Applique and my heat gun to create frosting. It's hard to tell in the picture but before I heat set the Liquid Applique I sprinkled a little bit of Prisma Glitter on the frosting to give it a little sparkle.


Thanks for checking out my layout today! The entire layout was completed using the Fanfare Workshop On the Go Kit (WOTG). All WOTG kits include a full level 2 paper pack, an exclusive B-size stamp set, a full pack of embellishments and an instruction guide for making layouts, cards or both! Check out the full kit HERE.

Supplies used (all CTMH unless otherwise noted):
Paper: Fanfare
Stamps: Fanfare WOTG
Ink: Indian Corn Blue, Cranberry
Other: 2" Scallop Circle Punch, Liquid Applique, Heat Gun, Prisma Glitter, Embrodiery Floss (Neutral Assortment)

Monday, May 23, 2011

Follow Your Dreams Layout

I've been playing with the You & Me Kit and wanted to share one of the layouts I made. It actually came together quite easily with the step-by-step instructions. Yeah, no heavy thinking on my part!


This particular layout features my baby boy at his one year photo shoot. He didn't last too long at the shoot but his personality definitely came through! I may be biased but I think he's quite the cutey pie! The colors in the paper matched perfectly with the photos don't you think?


This layout has a ton of dimension with the chipboard accents and mocha pearls. The chipboard comes already embossed so all I had to do was ink it up with a sponge to get the embossed resist affect.


Here's another close-up of the page details. I stamped the flourish using the stamp set included with the You & Me Kit. Does it look familiar to you? It should because it's the same set I used on my Paper Piecing post the other day!

If you would like to learn more about this kit go to the video and post HERE. If you would like your own kit to play with (and who wouldn't with all that's included) then contact me at handmadefromtheheart@gmail.com or go HERE to order.

~Michelle


Saturday, May 21, 2011

Mojo Monday 191 - Celebrate!

Each week, the Mojo Monday blog publishes a new card sketch. This week I was inspired by the sketch to create a fun and simple birthday card for my son's friend.


To make the card I stamped the balloon from the Fanafare WOTG stamp set 3 times in Indian Corn Blue Ink. Then, I stamped the same balloon twice with Honey Ink and trimmed out. On those balloons I also stamped the star image using Olive ink. I trimmed the balloons out and used 3-D foam tape to pop up.

The balloon strings were created using Black Hemp. To get them to stay I used a small bead of Liquid Glass (this stuff is amazing!!) and topped them with a small piece of You Rock B&T paper. The Celebrate sentiment was stamped twice using the Salutation Seals stamp set and Outdoor Denim and Honey Ink. I trimmed both and paper pieced them together.

Thanks for checking it out!

Supplies Used (all CTMH unless otherwise stated):
Paper: You Rock (retired), White Daisey Cardstock
Stamps: Fanfare (WOTG B1377), Salutation Seals (C1461), Party Pennants (C1429)
Ink: Outdoor Denim, Honey, Olive, Indian Corn Blue
Other: Black Hemp (Z282), 3-D Foam Tape (Z1151), Liquid Glass (Z679), Autumn Harvest Brads (Z1215)

Wednesday, May 18, 2011

Win a Studio J 5-Pack!!!


Kristine Widtfelt, CTMH's VP of Marketing, was a featured guest on the Creating Keepsakes Blog. She was discussing one of her favorite (and one of mine) favorite CTMH products, Studio J.


Click HERE to read her article and find out how to win a free Studio J 5 Pack!!! A 5-pack includes 5 two-page layouts, 5 Memory Protectors®, and free shipping. It’s a great gift, and a great way to get started with Studio J scrapbooking!
studioj patterns Weekly Warm Up: Time Saving Solution For Your Scrapbooks

Want to see what all the hype is about? Go HERE to try Studio J for yourself! I would love to know your thought on it. Remember, Studio J is free to use. Give it a try and leave a comment with your thoughts and you will be entered to win a free goodie from me too!

~Michelle

Tuesday, May 17, 2011

Editing Your Photos with Studio J

Want to make digital scrapping even faster, simpler, easier?? Then watch this video about how to edit your photos while your scrapping! No photoshop needed here!


If you would like to try Studio J for free or order a membership go HERE!
~Michelle

Sunday, May 15, 2011

Paper Piecing With Stamps

Welcome to our Technique Blog Hop!  This month there are 12 of us highlighting the “Paper Piecing” Technique as shown on page 27 in the Spring/Summer 2011 Idea Book!  This blog hop is a great big circle so you can start wherever you want and continue through to see all the fabulous artwork incorporating this technique.  If you would like to start from the beginning, please visit this LINK. While there you will also find a listing of all participants and their blog addresses if you should get lost or want to reference a blog along the way.  Let’s get started!

If you are coming from Debi's Blog, you are on the right track!  This technique is highlighted with the Sophia paper packet in the Idea Book but you will find variations for its’ use through this hop. 


To create this journal I used the paper piecing technique on three pieces: the journaling block, Life's Good ticket and Happy Day ticket. To make the the Life Is Good ticket I stamped the same image three times on Sweet Leaf, Colonial White, and Crystal Blue Cardstock. I trimmed the Crystal Blue and Colonial White stamped pieces and adhered onto the base Sweet Leaf stamped image.


Next, I used the same method as above but stamped and heat embossed the journaling block on Chocolate cardstock. Then, I stamped the same journaling image on Colonial White Paper and trimmed around the inside piece to layer on top of the chocolate base image.  I just love the added dimension it gives my journal!


If you would like to see my supply list, please continue reading below.  If not, please continue onto Neely's Blog where you will find some additional artwork highlighting this technique!  Be sure to leave a comment and let me know what you thought of my variation and happy hopping!

Supply List (to view or order the following supplies go HERE):  
Paper: Sweet Leaf (X5639), Chocolate (X5643), Colonial White (1388), Crystal Blue (1292), Miracle B&T (X7133C)
Stamp: You & Me (D1495) *ONLY AVAILABLE THROUGH MAY 31*
Ink: Chocolate (Z2111), Crystal Blue (Z2117), VersaMark (Z891)
Other: My Creations Journal (Z1268), White Embossing Powder (Z673), Pearl Opaques (Z1336), 3-D Foam Tape (Z1151), Cocoa Collection Designer Ribbon (Z1316)
Tools: Craft Heater (Z555), Craft Tray (1764), Piercing Tool Kit (Z1114), Craft Heater (Z555), Sponge (Z697)

Thanks for stopping by!  Continue onto Neely's Blog to continue the hop!

Saturday, May 14, 2011

Teacher Gift - Pocket Tag Mini Album

The other day I posted the candy pencils we made for fun teacher gifts. Today I wanted to show you the Tag Mini Album the kids and I made for their teachers.


Each mini-album is made out of one sheet of 12 x 12 B&T paper and the tags were cut using the Cricut Tags, Bags, Boxes, & More cartridge (scallop tag set at 4 1/4"). The book contains 4 pages and space for 8 tags. For our projects we decorated 7 tags and left the last pocket open for a gift card.

We kept the front covers pretty simple and stamped a Thank You/Gratitude sentiment on each. Ribbons are wrapped around the album to help keep the tags in place. And, to make it even easier to make with the kids we stapled ribbon scraps to the top of each tag.


Lucciano - 2nd Grade (Age 7)
 Each child decorated their own tags. The first tag of each album included a picture from the 1st day of school (wallet photos work great here). Luc chose to write about how much he loves getting candy when he answers questions. What kid wouldn't love that??!!

Sofia - Jr. Kindergarten (Age 4)
Sofia is learning to read and write so I helped her make her tags by asking questions and writing for her. When I asked her what her favorite thing about her teacher was she very quickly responded, "Her Hair!" Not exactly what I had in mind but we went with it!

Gianni - Ducks Room (Age 16 months)
Little Gino has a handful of words in his vocabulary so we used finger paints and pictures to show his love and appreciation to his teachers. Actually, we inked his little fingers with CTMH ink pads and made hearts, a flower and a hand print. It came right off in the bath!

The teachers loved them and so did I! Sofia's teacher told us it actually made her cry. Let's just hope it was in a good way!

If you would like instructions to make these albums please go HERE. I followed them exactly as shown and they came out beautifully!

~Michelle

Wednesday, May 4, 2011

Teacher Gift - Candy Pencil

This week is Teacher Appreciation Week. I personally don't think one week is enough to show my gratitude for the time and energy teachers put into our children. The endless patience and commitment they have is incredible and I thank you all! 

Generally I like to give my kids teachers a little something every day but this year I opted to make a special project for Friday (stay tuned for that one). Today, though, I wanted to show you this fun candy filled pencil. These come together really quickly and are a great little project for the kids to help with.

Here are instructions to make your own:
  1. Start with a 4 1/4" x 3 1/4" piece of yellow cardstock
  2. Score the cardstock every 1/2" and wrap around a tube of Rolo's. (I couldn't find the single tubes of Rolos so I bought a bag of individual ones and used mini-glue dots to stack about 6)
  3. To make the pencil point, attach a Hershey Kiss on the bottom with a mini-glue dot.
  4. Stamp or write a #2 at the eraser side and you are done!
Honestly, the hardest part of this whole project was not eating all the Rolo's (one of my favorites)!


Thanks for checking it out!

Monday, May 2, 2011

National Scrapbooking Month - You & Me


Close To My Heart is celebrating National Scrapbooking Month in May with this fabulous promotion! The video and pictures really don't do this set justice. The papers are so pretty and the stamp set is very versatile. You can pretty much gurantee you'll be seeing projects using both.

This kit is only available in May. It's yours when you do one of the 3 options (HINT: #3 is the best option)...

  1. Place a minimum order of $50 and get the exclusive You & Me Scrapbooking Kit for just $15! That's more than half off the retail value of the kit!
  2. You can purchase it outright for $34.95, with or without a minimum purchase.
  3. Consultants you join Close To My Heart in May will receive the kit for FREE and get the Consultant Kit at 50% off the base price. That's over $250 in product for only $64.95! Now that is what I call a celebration!!!
Here's what's included in the kit:
  • 1- D size "You & Me" Stamp Set ($25.50 value)
  • 1 - 12" x 12" Colonial White Cardstock
  • 6 - 12" x 12" B&T Duos (note that these are thick, cardstock weight B&Ts)
  • 1 - 6" x 9" You & Me Irresistibles Chipboard Die Cut Sheet
  • 1 yd. Chocolate Striped Ribbon
  • 1 pkg. Opaques Mocha Adhesive Gems
  • 1 - Full-Color Cutting and Instruction Guide
Stay tuned for my take on this kit! Don't forget to take advantage of the 50% Consultant kit and FREE scrapbook kit by joining my team.

Click HERE to sign up or contact me for more info!

Sunday, May 1, 2011

Chairs To You!

Happy May to you! This is my favorite month and it's not just because my birthday is this month or we get to celebrate my favorite holiday, Mother's Day. It's my favorite month because we get to celebrate the passion we have for scrapbooking on May 7, National Scrapbook Day!!

I have so many things to share with you all. I'm literally bursting at the seams excited to share all the wonderful news that CTMH has. Be patient as I collect my thoughts (and photos).

In the meantime I do want to share a little project I recently made for this month's Stamp of the Month, "Chairs to You."  New neighbors moved in next door and I needed a quick welcome gift. So, I ran to my craft room and quickly made this cute bottle top gift card holder!

I found the instructions HERE and adapted it slightly so that the gift card showed from the top. To make the scene, I stamped the arm chair on top of B&T paper and trimmed. Doesn't it look like fabric? Next, I masked the top of another chair and used the bottom half as the side table. After that I trimmed a small vase out of blue cardstock and stamped and trimmed the flower from the stamp set to make a pot of flowers. I quickly finished by masking and stamping the "Home Sweet Home" sentiment to make a little sign. I used foam tape to add dimension to some of the stamped elements. This was much quicker than baking break or making a meal!

I hope you (and my new neighbors) like it. If you would like to see the entire stamp set or additional uses for this stamp set please go to Stamp of the Month Page above.

~Michelle