Showing posts with label Thanksgiving. Show all posts

Wednesday, February 11, 2015

Card-A-Thon Kits Available for Purchase


Last Saturday I hosted a Card-A-Thon event with the theme "A Year of Cards." It turned out great and everyone had a good time creating! Each attendee had 2 hours to create an unlimited amount of cards in whatever theme and quantity they wanted!


I created cards for one holiday a month using a variety of stamps and papers. I kept some of the cards pretty general, like July, making a birthday card instead of 4th of July.  Here's a closer look at each card (click on photo to see a larger version):


Most of the card ideas were based on CTMH's How-To-Books and on-line sketches but February's card was a total CASE of THIS one by Vicki W

For those that are interested I have 4 kits available for purchase! Each kit contains 12 cards, all pre-cut and pre-stamped for you! All you have to do is assemble them based on the included color photo and you're done! The cost of each kit is $15, or $20 if shipped out of state. 

If you'd like to order a set (or two) please choose one of the options below:

Northern VA Pick-Up  - $15:


Out of State Shipped - $20:


Happy Creating!

~Michelle


Sunday, February 1, 2015

February Card-A-Thon Class

On Saturday, Feb 7 at 10 am I will be hosting another Card-A-Thon class! I love these classes and hope you'll be able to join me! This month's Card-A-Thon theme is A Year of Cards. I've designed 12 different cards for you to choose from all based on a holiday for each month of the year. I'll be sharing all the cards throughout the week but here's a sampling of what's available to choose from:


Here's how it works...you'll have two hours to make as many cards as you can! Everything will be pre-cut and ready to make. Simply take each card box to your station and create! If you like a particular card feel free to make more of it (just be mindful of others who may want to make it as well). The only "rule" is that you must completely finish the card before moving on to the next one. The only supplies you'll need are your adhesive and VersaMat. The cost for this class is $15 or free with any $50 CTMH order!

I have a few spots open so if you'd like to RSVP here's the link: February Card-A-Thon Class

Hope to see you next Saturday!

~Michelle Battitori

Saturday, November 1, 2014

3D Paper Scarecrow - Fall Decor


I am totally in LOVE with my newest fall decoration! Can you believe it's made completely out of paper (aside from the buttons and hemp of course)??!! I can't wait to get him up on my mantle.


This adorable scarecrow was cut using the Leaves Are Falling design from Svg Cuts. It was super easy to cut thanks to my Explore and the fantastic written and video tutorial. I'm not going to lie...it took some patience (and some sticky fingers) to make but I'm really happy with the result!

Supplies Used (All CTMH unless otherwise noted):
Paper: Pathfinding B&T, Glacier Cardstock, Olive Cardstock, Blush Cardstock, Barn Red Cardstock, Cocoa Cardstock, Sunflower Cardstock, Black Cardstock, Bamboo Cardstock
Ink: none
Stamp: none
Other: Leaves are Falling SVG File (SVG Cuts), Hemp, Buttons (from my stash), Hot Glue, Liquid Glass

Have a wonderful day!

~Michelle

Monday, November 25, 2013

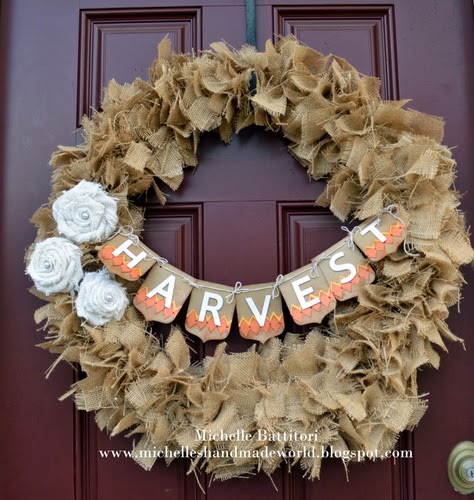
Burlap Harvest Rag Wreath


I finally finished this burlap wreath...just in time for Thanksgiving! It was a lot of fun to make (although quite messy with burlap) and pretty easy too.


The banner was a last minute addition which I cut from the Cricut Artiste cartridge. It was based on artwork from the 2012 Autumn/Winter Idea Book (love keeping old copies for inspiration).


The pieces were cut at 4", letters at 2" and argyle pieces at 1 1/4". It's hard to tell in the photo but I sponged each banner piece with Brown Bag Ink and then used re-inker and my spray pen for some added texture. I finished off each piece with some Bronze Glitter Glue and Hemp.


The white burlap roses were so easy. You can search You Tube for lots of different instructions and techniques. I added a CTMH pearl to the center of each for some added bling...on my daughter's recommendation! The roses were hot glued to the wreath. I was a little worried they wouldn't stay but a very windy day tested it and they stayed perfectly!


 Thanks for looking and having a fantastic Monday!

Friday, December 28, 2012

So Thankful Scrapbook Layout


Here's a 2-pager I recently created to showcase our Thanksgiving this year.


I used a mix of current and retired CTMH papers and accessories. The stitch lines on the felt shapes were created with a gold Metallic marker.


The title was created using the new Irresistibles Houndstooth Alphabet. I colored the letters with CTMH alcohol markers which blend beautifully together and help tie in my paper colors. The "so" in the title is from the Felt Keepsake Alphabet.

Supplies used (all CTMH unless otherwise noted):
Paper: Colonial White Cardstock, Olivia (retired),
Stamps: none
Ink:  Alcohol Markers, Metallic Markers
Other: Heartfelt Shapes (retired), Irressistbles  Houndstooth Collection, Felt Alphabet 

Sunday, December 2, 2012

30 Days of Gratitude - Weeks 3 & 4

Here are weeks 2 & 3 of my 2012 Gratitude Journal (you can click on the photos for a bigger view):
Day 16: My DVR
Day17: Creative Time

Day 18: Girl Time
Day 19: My Chiropractor

Day 20: Healthy Babies & Growing Families
Day 21: Getting out of work early
Day 22: My Parents
Day 23: Lazy Days

Day 24: The Gym
Day 25: Husband that pushes me

Day 26: Kids who like school
Day 27: Our Church

Day 28: E-Meals
Day 29: Pedicures

Day 30: Date Night!

Back Inside Cover


My Journal Closed

I learned a few things while doing this daily journal:
  1. Perfect pictures aren't realistic. Use what you have...that's part of documenting the process.
  2. Make sure you have strong adhesive to bind the book.
  3. With binding make sure to account for the thickness of the pictures/cards...also relates to #2!
  4. Jot notes daily and then complete 1 week at a time.
  5. Tell the "why." It's easy to write who and what but going a little deeper is what makes this special.
  6. Have fun!!
  7. Make it an annual thing!!
Here is Week 1 (with album construction) and Week 2.

Saturday, November 17, 2012

30 Days of Gratitude - Week 2

Feel free to click on the photo to read the stories.

Day 8: Cuddle Time
Day 9: My Hubby
This week wasn't the easiest. Work was the worst its been in a long time. It wasn't the volume of work or being super busy. It was because of major drama and feeling like I lost a close friend. It certainly was not the way I envisoned my week to go.

Day 10: Sunsets
Day 11: Good Attitude

There were a couple of days where I felt like I had to really think about what I was grateful for. It was a good exercise though and I'm glad Dan and the kids made me think about it each night at dinner.

Day 12: Women's Support
Day 13: Laughter
I could easily have slipped into that dark moody place that nobody likes. But instead, I chose to find something good and focus on the positive!

Day 14: Old Friends
Day 15: Peace
I absolutely L-O-V-E this project! It's fun, it's simple, it's therapy and it's easy! If you want to see Week 1 and my album design please visit THIS POST.

Thanks for looking!

Saturday, November 10, 2012

30 Days of Gratitude...A Journal


I was inspired to create a 30 day gratitude journal after reading Cathy Zielske's 30 Days of Thankful blog post. The concept is really easy...each day write about something you are are thankful for and take/find a picture to match. I know a lot of people are doing something similar on FB but I love the idea of having a hard copy with photo reminders...I am a scrapbooker after all!


I created the journal using Vicki W's super easy mini album instructions found HERE. My only changes were that I added several more pages and I attached a ribbon around the outside before applying the scrapbook pages on the cover to create a tie close. I love that it fits 4x6 photos perfectly! I used my Cricut Artiste to cut the shape and title and stamped a background image on the title for some extra depth.

I created a template in word for my journaling blocks (3 x 5 index card) and merged the first two lines to create a larger title block. The date tabs are made using this month's SOTM, Capture the Date. Here are my first 7 entries (my photos in the journal are nowhere close to perfect and I'm totally OK with that!). Feel free to click on the photo to enlarge and read the journaling. Just don't critique my spelling and grammer!:


Day 1: Our House
Day 2: Pizza Night
Day 3: Hot Chocolate & Hand Warmers

Day 4: YouTube Videos
Day 5: Leftovers


Day 6: Voting
Day 7: My dear friend, Mary Ann


I look forward to sharing next week's pages. Thanks for checking it out!

Supplies (all CTMH unless otherwise noted):
Paper: Flirty Level 2, Dreamin' Level 2 (retired), White Daisy Cardstock, Chocolate Cardstock
Stamps: Capture the Date (Nov SOTM)
Ink: Goldrush, New England Ivy
Other: Cricut Artiste, Chocolate Ribbon, Shimmer Designer Brads, Bronze Glitz Glitter Gel, All Out Adventure Rub-On's (retired)

Sunday, November 27, 2011

Our BeautiFUL Life Layout

Now that my computer is fixed I have the opportunity to scrapbook again! So, yesterday I created this layout highlighting our 2010 Thanksgiving. I was 7 months pregnant and my doctor's didn't want me to travel so we stayed home and had an intimate celebration...in our PJ's!! It was lovely and completely relaxing!


I started out with the Imagine "Up the Tempo" sketch but didn't like the orientation of the left page so I rotated it to fit my needs.


The pattern paper is an old Making Memories Kit I found in my stash while I doing some scraproom cleanup (yet another advantage of a broken computer). I didn't have cardstock in the kit so I looked through the 60 CTMH colors and found Juniper...a perfect match!


I didn't stamp one itty bit on this layout (I did ink the edges of my cardstock though)! That might be a first for me. Instead, I used the stickers and tags that came with the kit to create my title and embellishments. I did use my Cricut Art Philosophy Cartridge to cut the "LIFE" in my title. The alphabet set on the cartridge coordinates perfectly with the Dimensional Elements chipboard!


Thanks for looking!

Supplies used (all CTMH unless otherwise noted):
Paper: Making Memories Autumn Spice Kit, Juniper Cardstock, Colonial White Cardstock 
Stamps: none!
Ink: Chocolate, Barn Red
Other: Cricut Art Philosophy Cartridge, Dimensional Elements Alphabet, Ribbon (from my stash)

Saturday, November 26, 2011

Give Thanks Mini Album


 I hope you had a wonderful Thanksgiving. Mine was a little different than normal. My poor daughter was sick so we chose to have her stay at home with me while my husband and boys visited family out of state. It wasn't my ideal holiday but I still wanted to take a moment to celebrate all the things I am thankful for. So, I made this super cute mini-album, "Give Thanks".


The base of the album is made with 3 of the 6" x 6" Kraft Die Cut Cards (the same ones I used in November's card club). You'll be able to make 2 of these albums out of one package. Cute and economical!!


Using the new Cricut Art Philosophy Cartridge, Journaling Spots and Color-Ready Cork Alphabet this album literally came together in just a couple of hours. I love projects like that don't you??!! Here's a close up of the cover. The scallop flap holds the album closed.


With a few different paper choices I think this album would fit so many themes - Christmas, New Baby, or any special event you want to highlight.
If you'd like to make a project similar to this you will need the following items:

Supplies used (all CTMH unless otherwise noted):
Paper: Believe Level 2, Dreamin' Level 2, Colonial White Cardstock, Cranberry Cardstock, Olive Cardstock
Stamps: A Little Thanks (D1444), Treasure Life (D1306), Cricut Art Philosophy Stamp Set, Miracle WOTG (B1378)
Ink: Cocoa (Z2114), Olive (Z2137), Bamboo (Z2103), Cranberry (Z2116)
Other: Cricut Art Philosophy Cartridge, Kraft Die Cut Cards and Envelopes (Z1474), Color-Ready Cork Alphabet (Z1450), Journaling Spots (Z1461), Brads-Green Assortment (Z1364), Cocoa Marker (Z2314), 3D Foam Tape (Z1151), Piercing Tool (Z337), Bone Folder

P.S. Don't forget about my Thanksgiving Sales Event! There's only  a short time left in this special.